How to Trim Audio for Free on PC

The ability to trim audio is one of the most needed features and skills when working creatively with sound. There are many ways to trim an audio file. Sometimes you will need a professional audio editor like Adobe Audition or Pro Tools.
But if you're like most people, you won't need software that requires a lot of experience and knowledge. Even better, free sound editing tools are available to trim audio files.
Read on to find out how you can trim your audio files for free without using an expensive, hard-to-use tool.
For the sake of this tutorial, we will be using our favorite, top-ranking free audio trimmer, AudioDirector.
- What is Audio Trimming?
- Best Software to Trim Audio
- How to Trim Audio Online
- How to Use Software to Trim Audio
- Download the Best Software to Trim for Free
- Trim Audio FAQ
What is Audio Trimming?
Audio trimming is the process of removing unnecessary or unwanted parts from an audio file.
This can be done for many reasons such as reducing the size of the file, removing unwanted sections, removing background noise, etc.
Whatever may be the reason, the whole process is quite simple and easy to follow.
Best Software to Trim Audio
Well, now that you have learned what precisely audio trimming is and where it's mostly used, you might be wondering what some of the best tools available are.
There are many audio trimmers that can perform quite efficiently. However, not all of them are free, and some even require the installation of extra plugins and add-ons to make them fully functional.
AudioDirector is one of the few solutions that act like a swiss army knife, with all the tools you need ready to go.
Let's take a closer look at both the online and offline versions of AudioDirector and see how they can fulfill your needs.
MyEdit Audio - Best Web-Based Tool

MyEdit Audio is a web-based application that requires no installation whatsoever. You only need an internet connection and an up-to-date web browser such as Chrome, Safari, Firefox, etc.
The best thing about this tool is that it doesn't leave any footprint on your computer or require an installation. Once you open the website, you will be presented with a user-friendly interface allowing you to complete all your sound editing tasks.
You simply upload your audio, remove unwanted parts by trimming the audio track, and then download it in your desired format. The online audio editor provides multiple tasks such as audio trimming, vocal removal, voice changing, etc.
The only drawback of this tool is the file limit. You can't upload a file that exceeds 100 MB in size or has a duration of more than 10 minutes.
But that doesn't mean it isn't a good choice as an audio trimmer. It is the best option to trim a short audio or music track.
Give it a try now!
AudioDirector - Best Software

If you prefer not to work online or have longer tracks, we recommend AudioDirector. It's a free-to-download, lightweight software available on Windows PCs.
The best thing about using this tool is that, just like its online version, the software is straightforward and does not require any high-level knowledge. You can easily do various tasks such as audio trimming, recording, mixing, and restoring. In addition, the software allows you to edit multiple audio files, including MP3, WAV, MP4, WMV, etc.
Download to give it a try.
How to Trim Audio Online
Now that you know about some of the best tools available for trimming your audio files, it's time to learn how you can actually use them to get the job done.
In this section, we will look at how you can trim your audio files using MyEdit Audio.
The whole process is quite simple and easy to follow. Just head on over to MyEdit Audio and follow the directions below.
Step 1: Upload Your Audio File

The first step is to import your audio file into the trimming tool. Make sure you have navigated to Audio Trimmer under General Tools. Now drag and drop your file onto the webpage or click Choose a File to search your computer and upload it.
As mentioned earlier, the file sizes should be 100 MB and shorter than 10 minutes. The supported file formats are MP3, WAV, FLAC, and M4A.
Step 2: Trim Your Audio Track

Once you have imported your file, it's time to trim your audio. At either the beginning or end of the clip, click and drag your audio track to eliminate the section you want to remove. You can also Remove the selected part by choosing that option below.
Preview your audio and click Apply when you are happy with your trim.
Tip: If you are having trouble getting the cut precisely right, try using the mark-in and mark-out buttons to select the section of the track you would like to remove. Simply playback your track and pause it at the exact moment you want to trim, then mark it.
Step 3: Download Your Edited Filed
Once you are happy with your edited file, it's time to download it. For that, simply choose your desired file format and click Download.
You can export your file as a WAV or MP3.
And that's it! That's all you need to do to trim your audio files using MyEdit Audio.
How to Use Software to Trim Audio
Just like we mentioned before, some people are not very comfortable when it comes to using online tools. Perhaps this is because they want complete freedom of file size and supported formats.
Another thing is that the offline software versions are independent of the internet connection speed. This is another advantage because no matter how choppy or laggy your connection gets, you can still cut audio files without any problems.
Now that we have talked about the advantages of using an offline tool, it's time to learn how you can actually use it to trim your audio files.
Download and install AudioDirector onto your computer and follow the steps below.
Step 1: Import Your Audio File

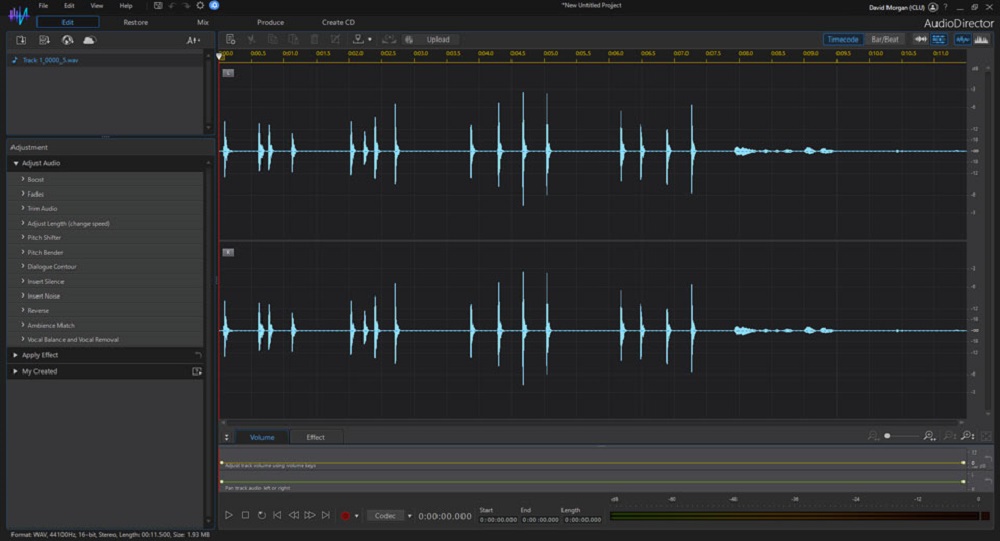
Just like the online counterpart of the software, the first thing you need to do to begin the process is to bring your audio files into the program. Open AudioDirector and simply drag your desired audio file into the software window and drop it, automatically importing it.
You can also use the Import media button to search for and upload your file.
As mentioned earlier, there is no limit when it comes to file size. The file formats that are supported by AudioDirector are quite vast, including MP3, WAV, FLAC, M4A, and a wide range of video formats.
Step 2: Trim Unwanted Portion

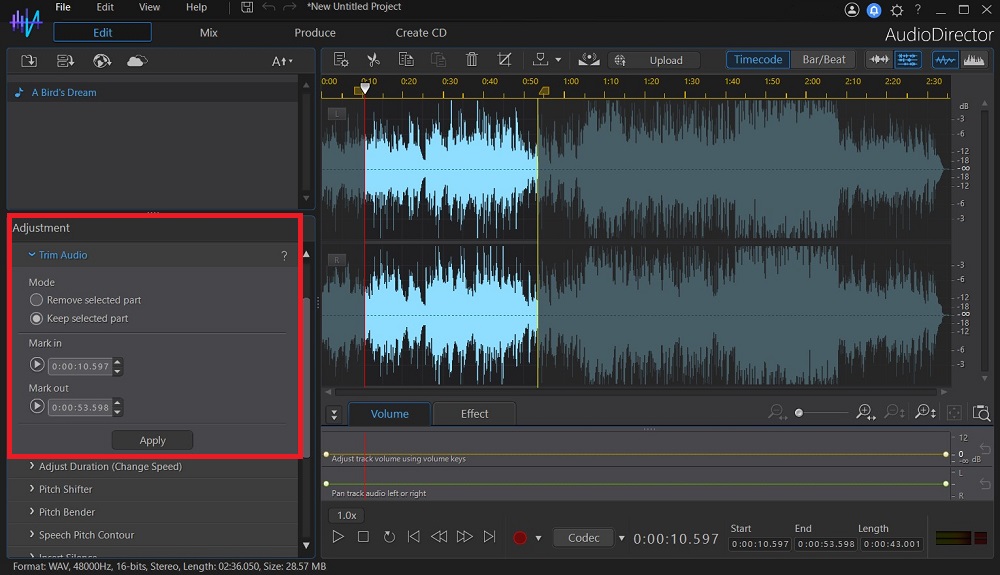
Once your file has been successfully imported, you are ready to trim. You can start trimming the audio by highlighting the portion you want to trim with mark-in and mark-out.To do this, drag the yellow markers on the timeline.
We highly recommend playing the video or audio file first before making any trims to confirm your markers are in the right place.
To trim, you need to open the Adjustment drop-down and the Trim Audio option. There you will find two options that allow you to either Remove selected part or Keep selected part. You can also adjust your marks via timecode.
When you are ready, you can Apply your trim.
Another option is to use the Cut tool to remove your highlighted selection. Or use the Crop tool to remove the unselected area.
Step 3: Export Your Edited File

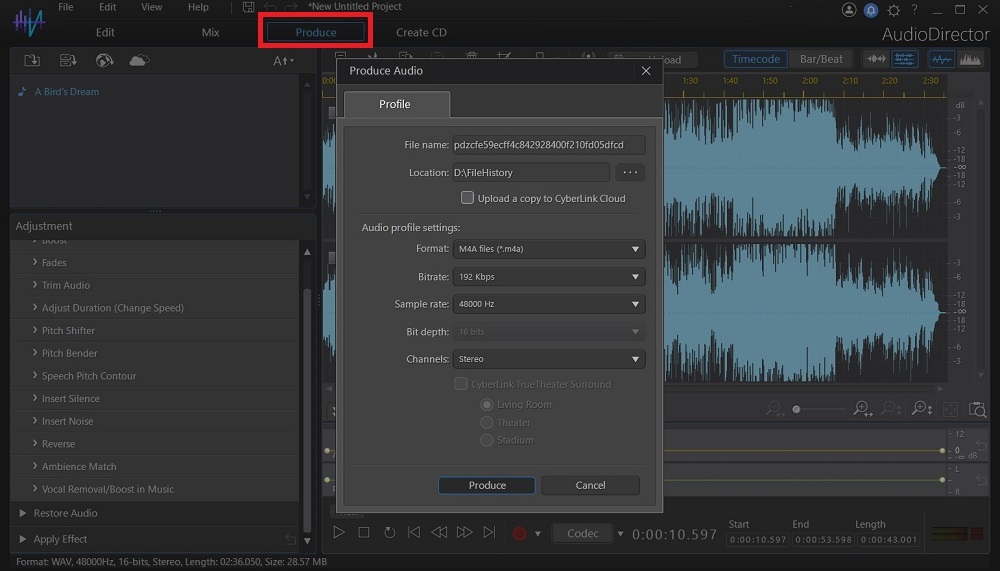
When you are done trimming your file, it's time to save it. For this, simply open File>Produce and select either Produce Audio… or Produce Video… depending on the kind of file you want to make.
Name your file and choose your output location and desired file format settings. The tool offers various file formats for you to choose from, so make sure that you select the one that is compatible with your device or software you intend to use. Then click Produce.
That's it!
Download the Best Software to Trim for Free
Now you know how to trim your audio files online and offline and the advantages and disadvantages of both methods.
Currently, the best solution for removing unwanted sections from your audio files is AudioDirector. We highly recommend downloading the software for free if you haven't already.
Trim Audio FAQ
1. What Features Should I Look For in Audio Trimming Software?
When it comes to choosing the right audio trimming software, there are a few key features that you need to look for. Here are some of them:
- Lightweight and easy to use
- Support a wide range of file formats
- Additional audio editing tools you can use
- Audio mixing tools
- Audio restoration tools
If you’re looking for a product that checks all of these boxes, we recommend AudioDirector
2. What Are Different Reasons to Trim Audio?
There can be a number of reasons why you might need to trim your audio files. Some of the most common ones include:
- To remove unwanted sections from an audio file
- To make it shorter
- To make an audio file smaller in size
3. How Do I Trim an MP3 File?
If you’re looking to trim an MP3 file, the process is pretty similar to trimming any other audio file. Simply open up the file in your chosen software and use the trim tool to remove any section that you don’t want. Once you’re happy with the edited file, simply export it in MP3 format.
4. Can I Trim Audio in Windows Media Player?
Yes, you can trim audio files using Windows Media Player. Simply open up the file in the player and use the editing tools to remove any unwanted sections. Once you’re happy with the edited file, simply save it.
5. Does Windows Have a Native Audio Editor?
Windows used to have its own native video editor your could use for audio called Windows Movie Maker. However, this program was discontinued back in 2017. As such, there is no longer a native audio editor available in Windows.


