How to Create Panoramic Pictures in 2024 [Windows & Mac]

Panoramic photos allow viewers to experience the vast beauty of nature scenes and see entire crowds in large group gatherings. However, if you’ve never created this type of photo from scratch before, you may feel intimidated by the process.
Thankfully, a few reliable methods exist to create a high-quality panoramic picture with photo editing software, and the right program can significantly ease your process.
PhotoDirector makes creating panoramic images from photos or videos a piece of cake. You can use it to merge multiple images into a panorama or extract a panoramic photo from a video.
Read on to learn how to create panoramic pictures with PhotoDirector on your Mac or Windows computer.
- What Are Different Ways to Create Panoramic Pictures?
- Best Software to Create Panoramic Pictures
- How to Create Panoramic Pictures
- Download the Best Software to Create Panoramic Pictures for Free
- Panoramic Pictures FAQ
What Are Different Ways to Create Panoramic Pictures?
Panoramic photos are images that capture horizontally elongated scenes, displaying more content than traditional photos. These images allow viewers to witness entire landscapes within a single photo rather than needing to view multiple images.
You can use several methods to create panoramic photos. The three primary ways are:
- Take a panoramic photo with a camera
- Create a panoramic photo from a video
- Create a panoramic photo from normal images
Taking a panoramic photo with a camera is the easiest way to capture this type of image. Many modern cameras and smartphones have panoramic photo options. You can typically follow these steps to take panoramic photos with a camera:
- Point your camera toward the left-hand edge of the field of view you’d like to capture.
- Press the “Capture” button.
- Slowly rotate your camera to the right, careful not to tilt it up or down.
The camera will capture a series of small images that automatically merge into a panoramic photo. While this method is quick and easy, it does not always produce quality results. Panoramic camera features often warp the final image, making it look unrealistic and messy.
You can create a panoramic photo by following the same process a camera does. First, point your camera toward the left-hand edge of the view you want to capture, then take a series of photos while rotating your camera to the right. You can even create a panorama from just two pictures.
You can also create a panoramic picture from a video. You’ll need to extract photos from a video, then merge them using an editing program. We’ll teach you how to create panoramic images with PhotoDirector below.
Best Software to Create Panoramic Pictures

PhotoDirector
PhotoDirector takes all the guesswork out of creating panoramic pictures from images or videos, creating a clean, high-quality finished product within minutes. Plus, it has all the photo editing tools you’ll ever need to touch up, adjust, color correct, add effects and edit your pictures.
How to Create Panoramic Pictures
PhotoDirector is a user-friendly editing program that makes it easy to create panoramic pictures from scratch. Here, we’ll teach you how to create panoramas from photos and videos using PhotoDirector.
How to Create a Panoramic Picture From Photos
One of the most effective ways to create a panoramic picture is to merge multiple photos horizontally, creating a wide shot that captures the entire scene you’d like to showcase. PhotoDirector’s Photo Merge tool makes it easy to create these pictures from your computer.
First, you’ll need to shoot the photos you’d like to turn into a panoramic picture. Here are some helpful tips to keep in mind while capturing your images:
- Keep your zoom, exposure, and focus point constant throughout each photo to create a more seamless merge.
- Overlap the images by around 30% to 50% to make it easier for PhotoDirector to align them.
- Use a tripod or set your camera on a flat surface to keep your photos level.
You can create a beautiful panoramic photo from just two images. However, if you’d like your final picture to be pretty wide, feel free to use three or four shots.
Once you’ve captured the photos you would like to include in your panorama, you can follow these steps to merge them with PhotoDirector:
- Open PhotoDirector and import all of the images you would like to use into your library.
- Under the Guided tap, click the Photo Merge option, then select Panorama.
- Drag the first two images you would like to merge into the designated window.
- Click Merge to combine the two images.
- Click the Adjustment tab near the top of the page, then make any changes you would like to the final image. For example, you can alter your final image's clarity, sharpness, brightness, exposure, and crop.
- Finally, save and export your image in your desired file type.
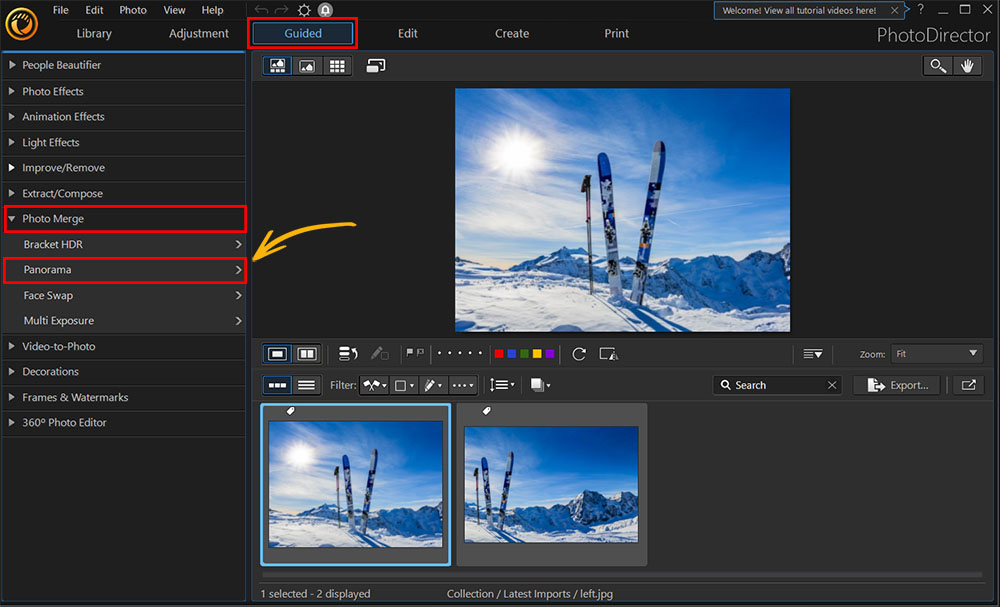
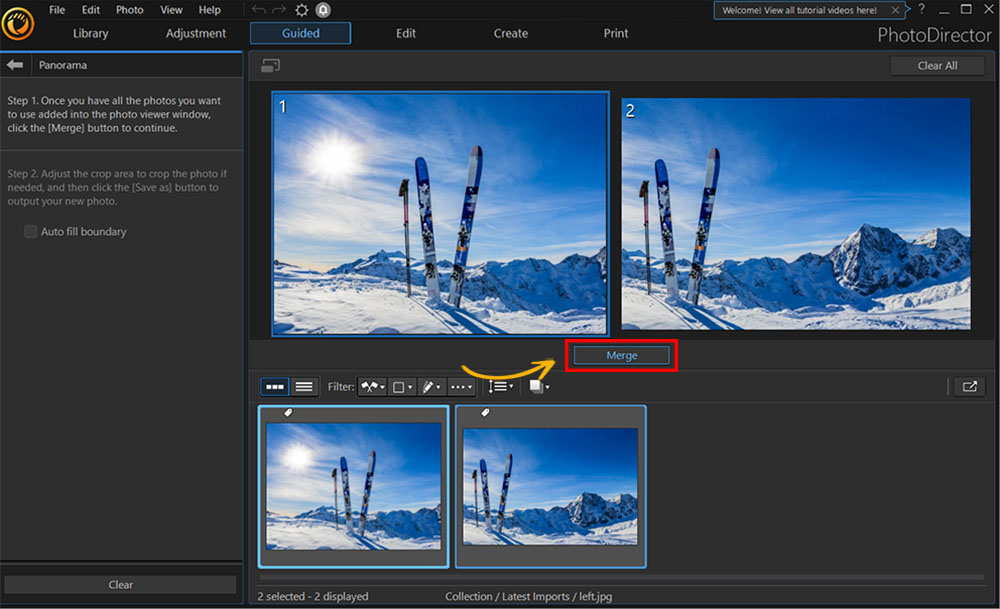
PhotoDirector will stitch the images together, then create a box indicating the maximum crop area. If desired, you can expand this box by clicking the Auto-fill boundary check box.

How to Create a Panoramic Picture From a Video
You can use PhotoDirector to turn a video into a panoramic picture as well. The basic method is to extract several images from a video, then merge them into a single panoramic photo.
You’ll want to begin by taking a video that you can later turn into a panoramic photo. Here are some tips for capturing the perfect panoramic video:
- Place your camera on a flat surface or a tripod to keep the camera steady throughout the video.
- Press the record button, then begin slowly moving the camera to the right. You can either rotate the camera on its axis or gently slide it horizontally to capture a broader view.
- Take several videos following these instructions to ensure that you have at least one usable shot.
Once you’re satisfied with your video, you can head to your laptop or desktop computer to begin transforming it into a panoramic photo. Simply follow these steps to turn a video into a panoramic picture with PhotoDirector:
- Open PhotoDirector and upload your video into the library.
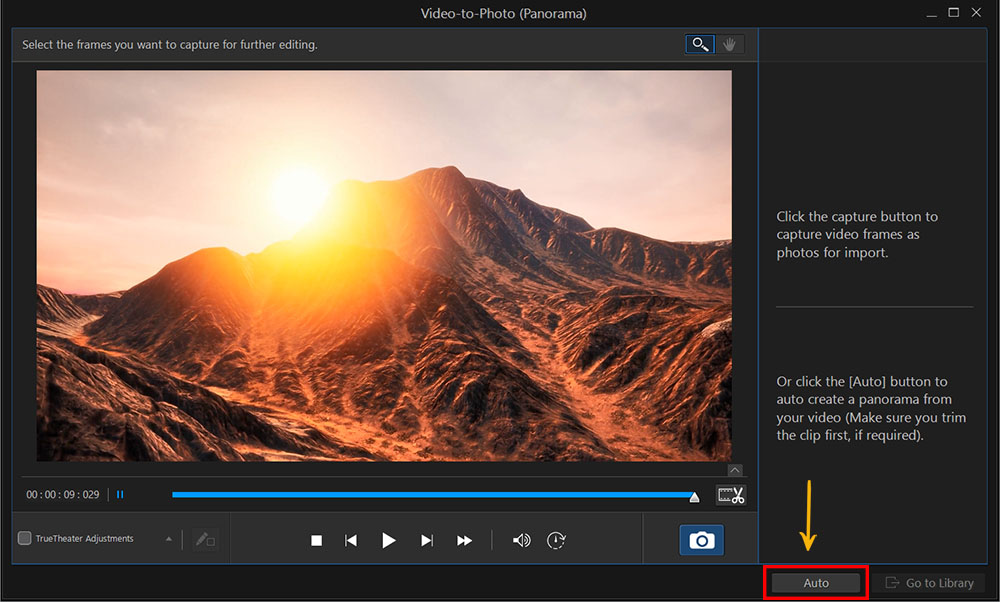
- Click the Create a Panorama Photo option in the Video-to-Photo interface.
- Click the playhead to begin playing your video. Then, click the button that resembles a camera icon to capture photos from the video.
- Once you’ve captured your photos from your video, click the Go to Library button in the corner of the screen.
- Select the Panorama tool, then click the Edit tab.
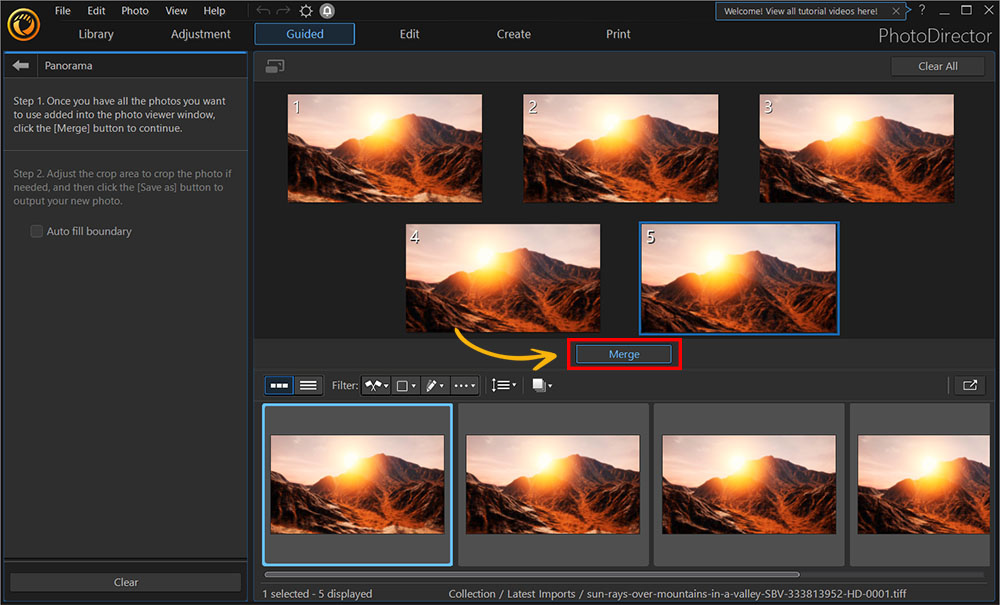
- Click Merge to stitch your photos together.
- Select the Auto-fill boundary checkbox to automatically fill any blank spaces in the created image.
- Click the Adjustment tab at the top of the page to view the editing tools you can use to adjust your panorama.
- Save and export your panoramic image.
When PhotoDirector detects that you have uploaded a video, it will launch its Video-to-Photo interface and list several tools you can use to edit the video.
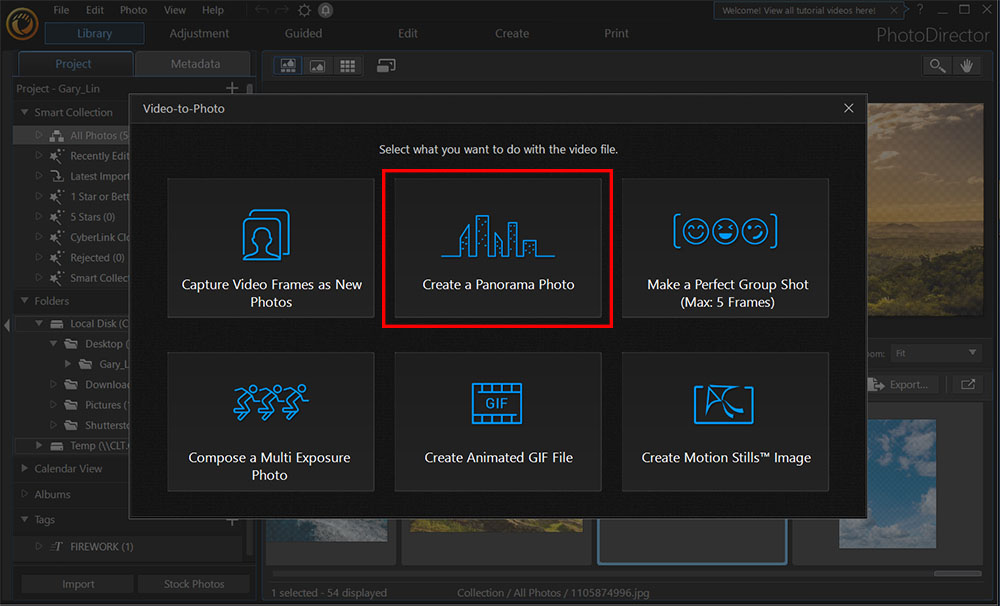
You will now be able to preview your video file and capture images from it.
We recommend capturing at least five photos from your video and ensuring that each overlaps with the next by about 20%.
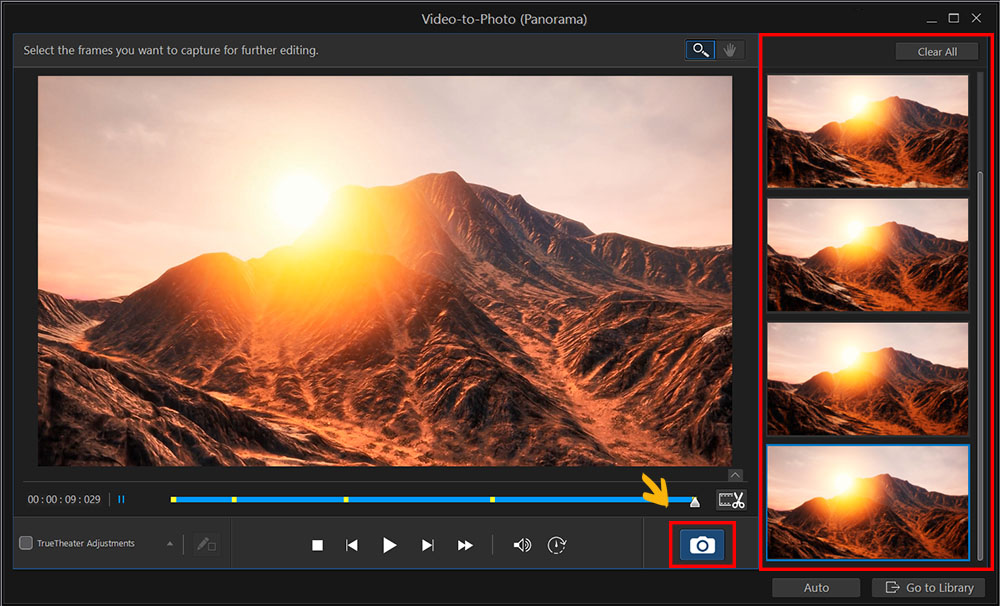
Tip: If you’d like to save time, you can click the Auto button in the Panorama editor to create an automatic panorama from your video. However, if you choose this option, be sure to trim the beginning and end of your clip so that only the portion you would like to include in the panorama remains.
PhotoDirector will display all of the photos you captured in the photo viewer window.
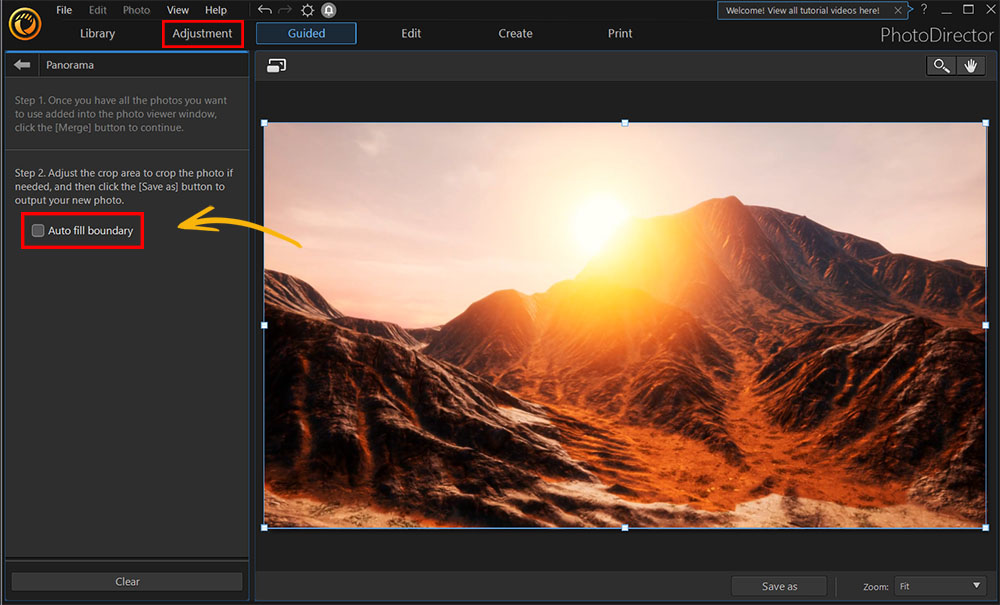
We recommend playing around with these editing tools until you’re satisfied with the final photo.
Download the Best Software to Create Panoramic Pictures for Free
Panoramic photos can allow you to capture all of the beauty in a stunning natural scene within a single image. However, if you don’t have much photo editing experience, you may falsely believe that creating a panoramic photo from scratch is outside your wheelhouse. Thankfully, with PhotoDirector, creating panoramas is quick and easy.
PhotoDirector includes tools that take all of the work out of creating panoramic photos. You can merge two or more pictures or capture images from a video to use within your panoramic image. Even if you have no photo editing experience, you can confidently create panoramic photos using the above steps.
Download PhotoDirector today to try out these panorama tools for yourself and create a gorgeous panoramic photo to share with friends.
Panoramic Pictures FAQ
1. What Features Should I Look For in a Panoramic Photo Editor?
Some photo editing programs make creating panoramas easier than others. If you’re looking to create a high-quality panoramic photo in a few easy steps, we recommend looking for a program with these top five features:
- Built-in panoramic photo editors
- Automatic merging tools
- Video-to-photo editors
- Professional photo adjustments
- A user-friendly interface
If you’re looking for a product that checks all of these boxes, we recommend PhotoDirector.
2. How Do I Create a Panoramic on iPhone?
The easiest way to create a panoramic photo on your iPhone is to capture a panoramic image using your camera app. You can follow these steps to take a panoramic photo with your iPhone camera:
- Open your Camera app and swipe to the Pano feature.
- Hold your phone vertically and position the bottom of the iPhone on a flat surface to avoid tilting it up or down while capturing the photo.
- Point your camera toward your desired starting point for your panoramic photo.
- Click the circular capture button to begin taking the panoramic photo.
- Slowly move your camera to the right, being sure to keep it in motion throughout the capturing session.
- Click the capture button again to end the panoramic photo.
This feature is typically the last feature on the right in iPhone camera apps. Once you click this feature, you’ll see an arrow and a horizontal line over the camera preview screen.
Your iPhone will then create a panorama from the series of images it captured.
If you’d like to create a high-quality panoramic image with your iPhone, you can capture several photos using the Photo tool in your camera, then upload them to PhotoDirector and merge them using the steps above.
3. How Do I Create a Panoramic on Android?
You can also create a panoramic photo using an Android smartphone. While different Android phones have slightly different cameras, you can follow these general steps to capture your panoramic image:
- Open the built-in Android camera app.
- Swipe your finger from left to right to navigate through the different camera tools. Stop once you reach the Panorama icon.
- Hold your phone vertically and position the bottom on a flat surface.
- Touch the camera’s shutter icon to begin capturing the image.
- Slowly move the camera to the right, being careful to keep the arrowhead pointed to the horizontal line.
- Click the shutter icon again to end the panoramic photo.
- View the complete panoramic image in your camera roll.
You can also use your Android phone to create a photo sphere, which shows a 360-degree view. Simply navigate to the camera’s Photo Sphere mode and follow the steps above to capture the image. You’ll need to rotate the camera in a full circle to capture a complete sphere.
If you’d like to merge multiple photos from your Android camera into a panoramic picture, you can simply upload them to PhotoDirector.


