How to Edit YouTube Videos on PC if You’re Just Starting Off

These days, anyone can record a YouTube video. Our phones have turned us into amateur videographers. And because we’ve consumed so much content and created so many social media posts, we have a basic understanding of things like framing a shot and good lighting.
However, one skill you can’t pick up simply by watching loads of videos is video editing.
If you are launching your first YouTube channel and have no clue how to edit YouTube videos, do not fear! This article will give you a step-by-step guide on how to edit YouTube videos using a beginner-friendly software. We’ll also provide tips for how to make your videos stand out, and answer all your frequently asked questions on topics like how YouTubers get paid.
- Basics of YouTube Video Editing
- Edit YouTube Videos for Free With PowerDirector
- How to Make Basic Edits With YouTube Studio Video Editor
- How to Go Beyond Basic Edits With PowerDirector
- How to Make a YouTube Intro With Templates
- How to Add Animated Titles to YouTube Videos
- How to Add Transitions Between Clips
- How to Add Visual Effects to YouTube Videos
- How to Add Music to YouTube Videos
- How to Export and Upload Videos Directly to YouTube
- 10 Tips on How to Edit YouTube Videos
- Download the Best YouTube Video Editor for Free
- How to Edit YouTube Videos FAQ
Basics of YouTube Video Editing
Before we dive into the specifics of how to edit YouTube videos, there are some basics every new YouTube video editor should know.
Know Your Channel's Tone
Hopefully, before you even began shooting you had a clear vision of your channel’s purpose and tone. This will help greatly in the editing process. If your channel’s purpose is to make people laugh, you can edit clips with wacky transitions and funny sound effects. If it’s more serious, you’ll want to edit clips with few effects and steer clear of emojis and stickers.
Be Consistent
Once you’ve figured out the tone of your channel, try to be consistent with your editing style. This includes having a similar soundtrack, intro/outro, branding, effects, transitions, and even thumbnails for all of your videos. Have you ever had a favorite TV show that changed the theme song for a new season? It feels really weird and off-putting. Your viewers will feel comfortable if they know what to expect.
Cut for a Story
All YouTube videos, even tutorials or reviews, should have some sort of story arc. Have you ever watched a video and thought “wait, did I miss something?” and tried to rewind to make sure you were actually at the beginning? Without a proper beginning, middle, and end, viewers will get bored and/or confused.
Don’t Overdo It
It can be fun to experiment with effects, filters, transitions, and stickers, especially if you’ve just learned how to edit YouTube videos. However, if you edit clips with too many flashy elements, it can get distracting. Make sure any elements you use are there to serve the story as a whole and not just to show off that you know how to use them.
Get a Second Opinion
Any editor from professional working on a feature film, to an amateur cutting home videos, can get so narrowly focused on the editing, that they forget the big picture. Maybe there’s a scene you worked really hard to complete, but it no longer serves the story. Maybe you are so focused on an effect you put into a scene that you don’t notice the glaring spelling mistake in the titles. Get the opinion of someone who isn’t too close to the project to make sure it flows and makes sense.
If asking someone else isn’t an option, take a break and come back later with fresh eyes.
Edit YouTube Videos for Free With PowerDirector

Compatibility: Windows, Mac
TechRadar Rating: 4.5/5
Price: Free
*Premium subscription available for $4.33/month
Key Features:
- Royalty-Free Stock Music, Images, and Videos
- AI-Powered Sky Replacement
- Animated Overlays
- Motion Tracking
PowerDirector is the best program to edit clips for YouTube. You can make professional-looking content for your channel quickly and easily. PowerDirector is extremely easy to use and learn, and it offers guided edits and plenty of tutorials. The software has everything you need to create a video that is sure to go viral - from basic editing tools like crop and zoom, to advanced features like visual effects and color correction.
Download PowerDirector by clicking the button below:
How to Make Basic Edits With YouTube Studio Video Editor
To get your hands dirty and learn how to edit YouTube videos right away, you can use YouTube’s own video editor. It is a very simple and free online editor designed by YouTube Studio for its creators. Though not intended to be a one-stop shop for editing all your videos, it's a good way for a beginner to learn how to edit YouTube videos with some basic tools.
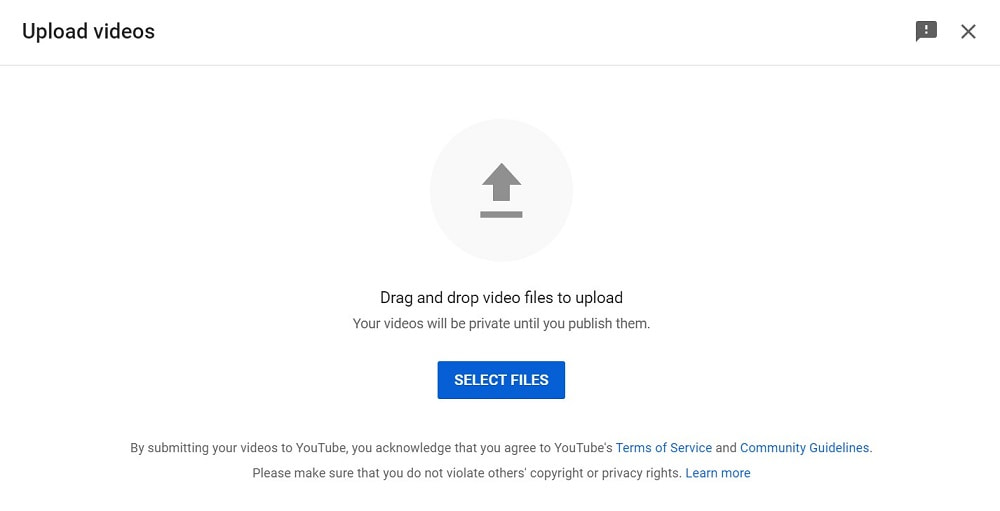
- Sign in to YouTube Studio with your Google account.
- From the Channel Dashboard, click the Upload icon in the upper right corner, then drag and drop all the video files you wish to upload into the window.
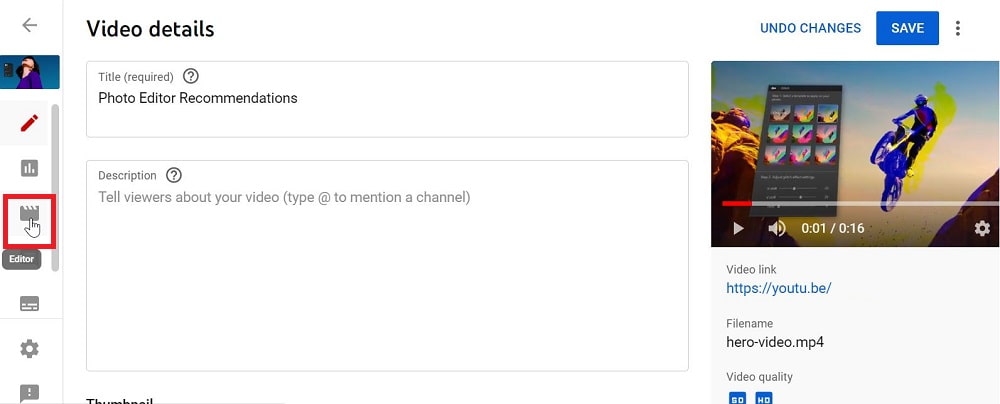
- Once your files have been uploaded, click Content from the left sidebar.
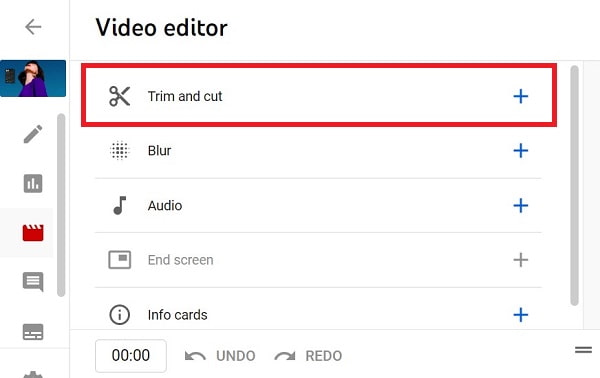
- Click the video you want to edit and click Editor.
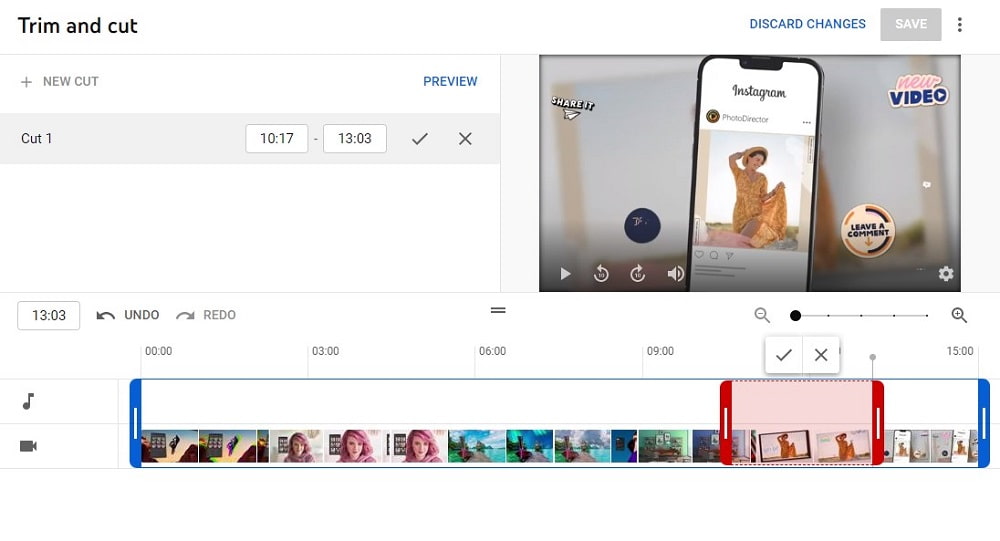
- Edit clips first with video trimming. Select Trim & Cut. Drag the sides of the blue box and stop when the box surrounds the area you wish to keep. Anything outside of the box will be deleted.
- Click Save
- If you're going to eliminate the specific clips in the middle portion of the video, click Trim & Cut, then New Cut.
- A red box will appear around your clip. Drag the edges of the box to cover the part you wish to delete. Anything outside the box will remain in your video.
- Click Cut, then Save.
- Once you've successfully cut the unwanted portion of your video, check out the final version by watching the Preview of the video. If you find everything in order, click Save and go to the next step.
- To encourage viewers to stay on your YouTube channel, add an End Screen to your video. Click End Screen from the left side menu, then choose a template. Click Apply Template.
- Save your edit, and you're ready to go!
Now you can begin customizing your videos.
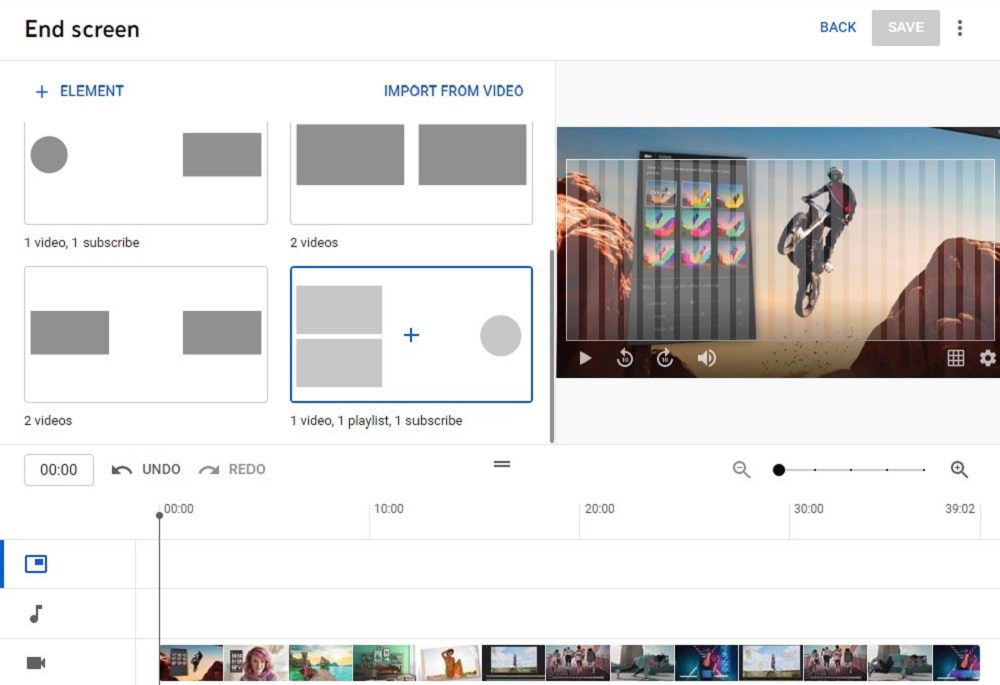
Through this option, you can add related videos or playlists, and ask viewers to subscribe to your YouTube channel after the end of your video.
This is how to edit YouTube videos with some basic tools. In the Timeline Panel, you can also add sound/music directly from the YouTube library, or you can use downloaded music.
How to Go Beyond Basic Edits With PowerDirector
Now we will show you how to edit YouTube videos with PC Mag Editor’s Choice for the best video editing software, PowerDirector. It’s one of the most popular ways to edit videos for YouTube (especially for beginners) because of its user-friendly interface and low learning curve.
Click the link below to download PowerDirector on Windows or Mac for free, then follow our step-by-step guide on how to edit YouTube videos.
How to Make a YouTube Intro With Templates
PowerDirector comes with thousands of YouTube intro templates, organized by theme. Open PowerDirector in Full or Storyboard Mode, then follow our steps to learn how to edit YouTube videos with templates.
- Open the Intro Video Room by clicking on the icon that looks like a play button with three dots underneath, found in the top left toolbar.
- Click on a theme or style and browse the available templates. When you find one you want to use, double-click it.
- The Intro Video Designer will open and allow you to customize the template. Click on an element in the preview window to edit it, or use the icons in the bottom toolbar, which we describe in the next steps.
- If you want to change the duration of your intro, click on the Clock icon and set the length.
- Click the Replace Background Media icon to replace the background of your intro. You can import a background from your desktop, or use a stock video/photo from PowerDirector’s library.
- Crop the intro by clicking the Crop icon and adjusting the crop box.
- Click on any text in the template to customize it. You can add additional text or a motion title by clicking the T icon.
- Click the Add Image icon to add an image to the template (either from PowerDirector stock or one of your own).
- Click the Add Video Overlay icon to add stickers or animated graphics from the Video Overlay Room.
- Change the background music by clicking on the Music Note icon and choosing a song from your computer or from PowerDirector’s royalty-free stock library. Then click the Volume button to adjust the volume.
- When you are happy with your intro, click Add to Timeline to continue editing your YouTube video.
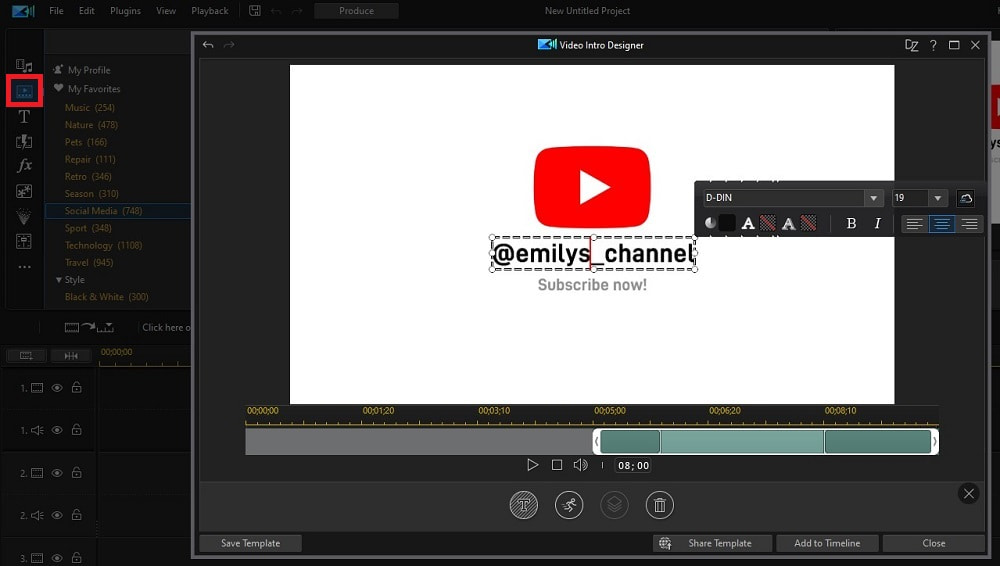


For more information on how to edit YouTube videos with intro templates, click here.
How to Add Animated Titles to YouTube Videos
Open PowerDirector, then follow the steps below to learn how to edit YouTube videos with animated titles.
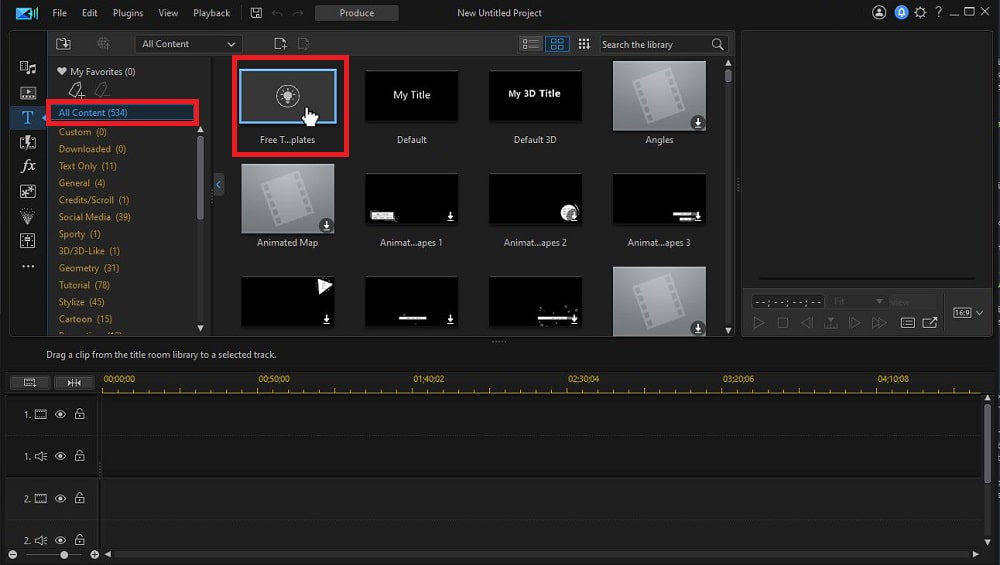
- Click the T icon from the left-hand toolbar to open the Title Room.
- Scroll through the available title templates, or choose a category to narrow your search. You can also click the Free Templates box to open DirectorZone and get a template made by another user.
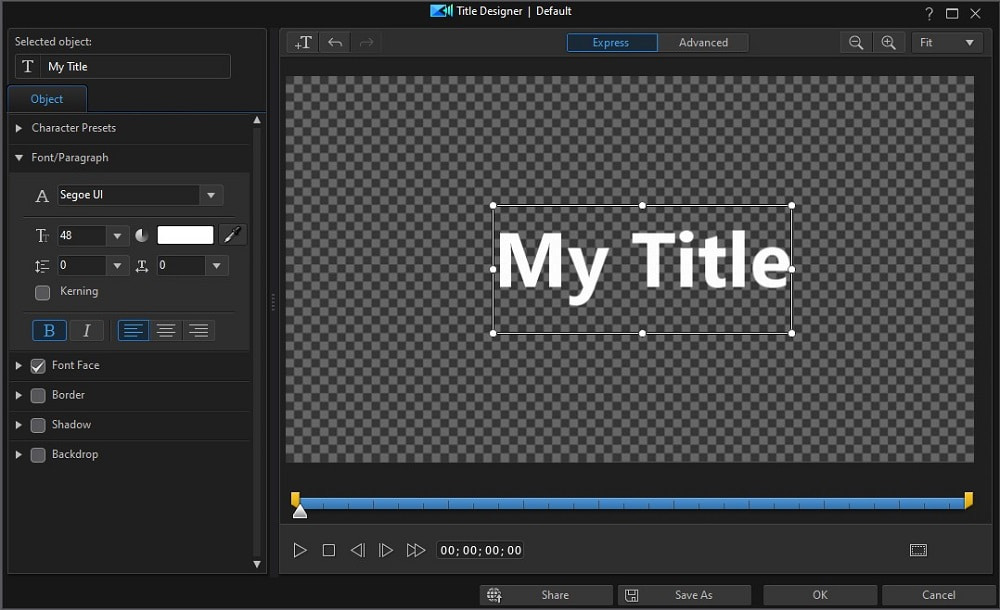
- Double-Click on your chosen title template to open the Title Designer, where you can customize the text.
- Type your text in the text box that says My Title. Choose a font from the drop-down menu. Continue to customize your text with the options provided, then click OK.
- Name your new template so you can use it again. Click OK. Your title will be saved under Custom in the Title Room.
- Drag and drop your title on the Video Timeline under the video track where you want it to appear.
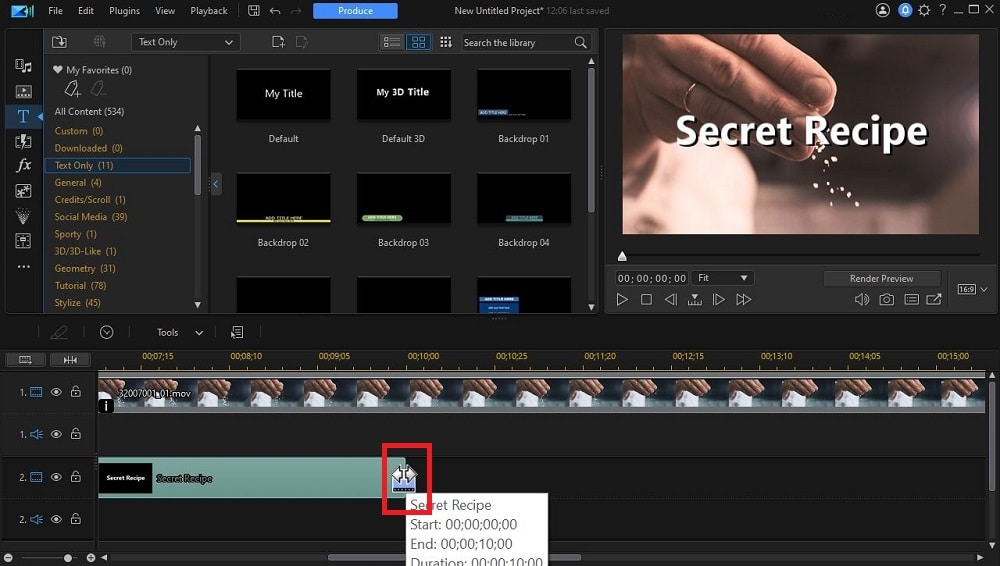
If you want to change the duration, hover your mouse over the edge of the title until you see a Double Arrow, then pull the edge to lengthen or shorten the time your title is visible.
How to Add Transitions Between Clips
Open PowerDirector and follow along below to learn how to edit YouTube videos with transitions.
- Go to the Transition Room by clicking on the Lightning Bolt icon from the menu on the left.
- Choose a transition, then click and drag it between two video clips.
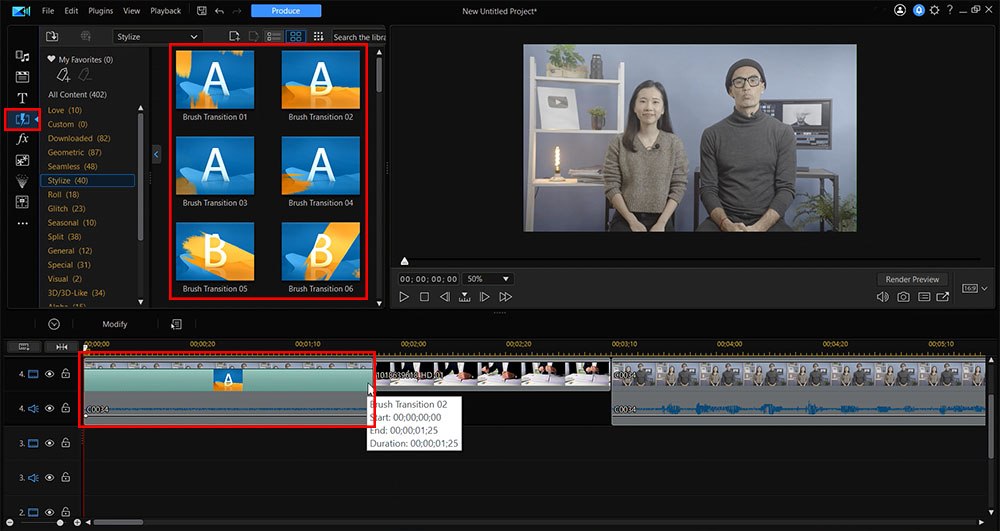
For a more detailed look at adding transitions, click here.
How to Add Visual Effects to YouTube Videos
Open PowerDirector, then follow along below to learn how to edit YouTube videos with cool visual effects.
- Go to the Effect Room by clicking the FX icon from the menu on the left.
- Scroll through the effects, or narrow your search by choosing either Style Effect, Color LUT, or Blending Effect. Click on an effect to view it in the Preview Window.
- For Color LUT and Blending Effects, drag and drop the effect onto a clip to apply it to the entire clip. For Style Effects, you can choose if you want to apply the effect to the whole clip (drag and drop onto the clip itself), or only part of a clip (drag and drop onto the Effect Track and adjust the length).
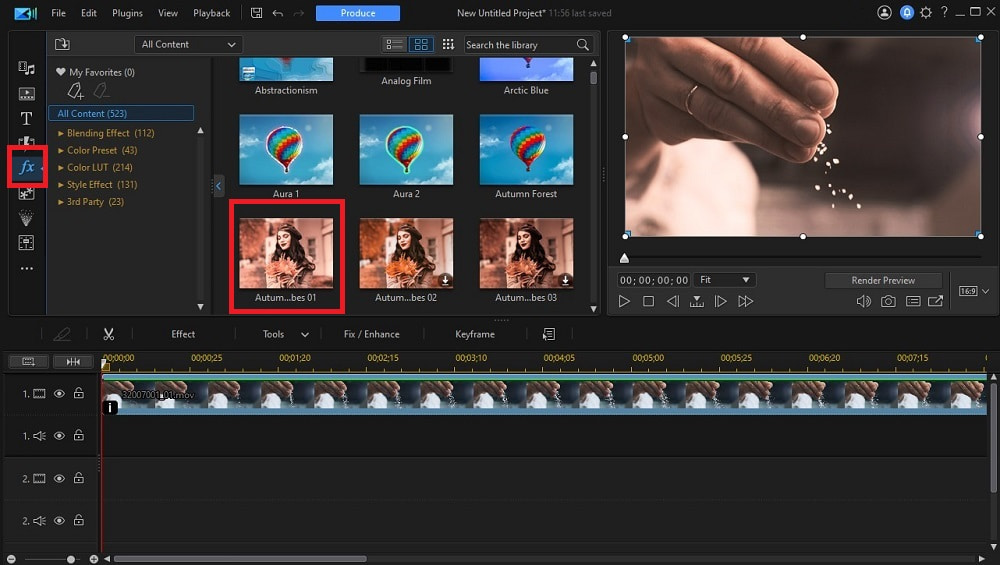
For information about how to edit YouTube videos with more advanced visual effects, click here.
How to Add Music to YouTube Videos
To learn how to edit YouTube videos with music, open PowerDirector and follow the steps below.
- Go to the Media Library Window and select Background Music from the Media Content drop-down menu.
- Preview and then click the Download button to download the background music track you want to use. After it has downloaded, drag it to an Audio Track on the Video Timeline.
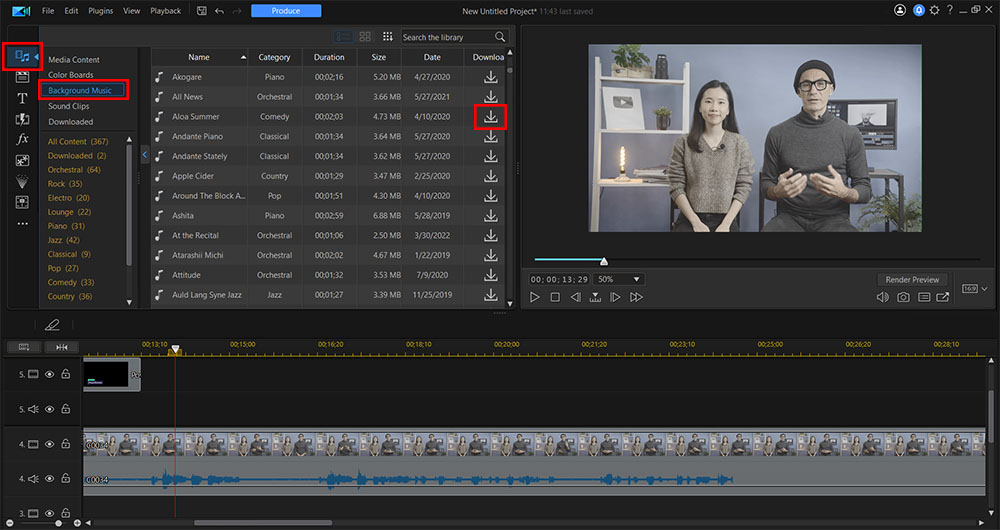
You can also import your own audio. Be careful to avoid copyrighted music so your video is not removed from YouTube. PowerDirector has a large library of royalty-free background music that is available for all subscribers.
For more information on how to edit YouTube videos with music, check out our tutorial on editing and importing audio in your projects.
How to Export and Upload Videos Directly to YouTube
- Click the Produce button to export your video. On the Online tab, select YouTube.
- Enter the video title, description, and other information. Click the Start button to render your video and upload it to YouTube.
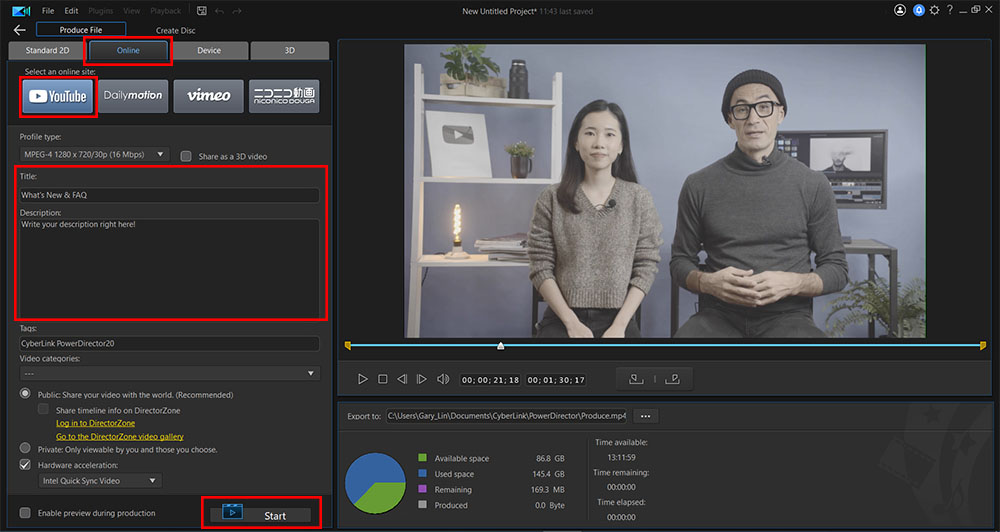
To learn more about how to edit YouTube videos and how to upload them directly to the platform with the proper metadata, click here.
10 Tips on How to Edit YouTube Videos
Now that you’ve learned the mechanics of how to edit YouTube videos, here are some tips to maximize editing workflow and make those videos as clickable as possible.
Tip 1: Know the YouTube Guidelines
Before you hit record on that first video, it’s important to read the YouTube Community Guidelines to keep your videos from getting removed. The guidelines have obvious rules about things like hate speech and violence, but also some things you might not realize, like regulations on marketing products to children or copyright violations.
Tip 2: Get Organized
Once you have your clips imported, we suggest reviewing and renaming each one, then organizing them in folders. Just like trying to cook an elaborate meal in the kitchen, having all of your ingredients organized will set you up for success.
Tip 3: Follow the 321 Rule
This is a rule of thumb for video editing and means having 3 separate copies of each video file in case of emergency. We recommend saving one copy to your PC’s hard drive, one in cloud storage, and one on an external device like a flash drive.
Tip 4: Know your Editing Software
Though you won’t always need to use them, it’s a good idea to know all the tools and features available in your editing software. It could save you hours of editing if you use the right tool in the right situation. Just imagine posting a shaky video when you had a video stabilizer all along!
Tip 5: Add Visual Interest
No one wants to watch a single shot of a talking head for 10 minutes straight. This is YouTube, not school! Even if you make a daily vlog of yourself in front of a webcam, vary the camera angles. If you are editing and only have one angle to work with, you can zoom in and out, pan, add b-roll, and add transitions during appropriate times to keep the visuals interesting.
Tip 6: Tighten up your edit
When you think you are done editing, always watch your cut from beginning to end. Chances are the overall flow won't be perfect the first time, so go back and polish up your video.
Tip 7: Mix your sound
Make sure your sound levels are balanced. Raise or lower any dialogue, voiceover, or music so the soundtrack is level and you can easily hear the most critical parts.
Tip 8: Edit for Phones and Big Screen TVs
YouTube videos are watched on all kinds of devices. Check that everything important is visible and not blurry when viewed on a large TV or a small device like a phone. Use a large enough font in a contrasting color so any text is readable.
Tip 9: Be Honest
When you fill out the title and description for your video, be honest about your content. Using “clickbait” phrases that have nothing to do with your video will cause viewers to quickly stop watching and report your channel.
Tip 10: Edit your Video Thumbnail
If you don’t come up with a thumbnail for your video, YouTube will choose one for you. It will be a random still from your video and won’t look professional or entice viewers to watch. Before you upload your video to YouTube, have a custom thumbnail ready. Remember to be consistent with the look of your thumbnails and use your brand’s colors and font.
For more tips on starting a YouTube Channel, check out How to Become a YouTuber: The Ultimate 8 Step Guide.
Download the Best YouTube Video Editor for Free
The best way to learn how to edit YouTube videos is with PowerDirector. PowerDirector’s interface is highly intuitive and designed to make it incredibly easy for editors of any skill level to make pro-level cuts, fast.
Don’t think for a second that its ease of use means it’s lacking in capabilities. PowerDirector is jam-packed with powerful tools and effects to edit clips. It has whole libraries of drag and drop transitions, sound and video effects, particles, and titles. The built-in Action Camera Center makes it a breeze to fix footage including a video stabilizer and a whole area dedicated to video speed effects.
It even has a wide variety of advanced editing tools like chroma key, motion tracking, and a mask designer. To top it all off, it has a huge built-in stock library of royalty-free music, photos, and videos you can use in your YouTube videos.
Download PowerDirector today by clicking the button below and start creating amazing content.
How to Edit YouTube Videos FAQ
Here’s a step-by-step guide for how to edit YouTube videos on an iPhone or Android device using the PowerDirector app:
- Open the app and tap New Project. Name the project and choose the video’s Aspect Ratio (we recommend 16:9 for YouTube).
- Tap on the videos you would like to edit in the order you want them on the timeline. Tap the + in the middle of each clip to download.
- Tap the + Intro box to the right of the timeline to add a YouTube intro from a template.
- To trim your video, click on the beginning of the clip and pull the sliders to where you want it to start. Do the same at the end.
- Tap the spot where two video clips meet to open the Transition Library, then find and tap the transition you want to use.
- To add text, tap the Layers icon on the left. It resembles two pieces of paper, one on top of the other.
- To add music, tap the Import Media icon on the left, then choose Music. Tap Stock Music to browse PowerDirector’s royalty-free music library, or choose a song from your phone.
- Hit the Upload icon in the top right, then tap Share on YouTube.
For more information on how to edit YouTube videos on your phone, click here.
The top ten features you need to edit YouTube videos are:
- Trim/Split tools
- Text Templates
- Transitions
- Royalty-free music library
- Direct upload to YouTube
- Sound effects library
- Visual effects
- Sound mixing
- Color adjustment tools
- Video stabilization
If you’re looking for software to edit YouTube videos that checks all these boxes, we recommend PowerDirector.
The 5 best software to edit YouTube videos are:
- PowerDirector 365
- Kapwing
- OpenShot
- WeVideo
- Lightworks Free
For more information on the best software to edit clips, click here.
YouTubers edit clips into clickable content with PowerDirector. Not only is it easy to use and affordable, but it comes with tons of tools and features to cover any type of YouTube video. From an action camera center to visual effects, PowerDirector has it covered.
PowerDirector is also a great way to edit YouTube videos because it comes with a large library of music you can use in your YouTube videos, worry-free. It also comes with templates for YouTube intros/outros and offers direct upload to YouTube.
PowerDirector Essential is the free version of PowerDirector, and it can be used to edit clips at no cost. The first 30 days after you download PowerDirector Essential, you will have access to every tool and feature available in PowerDirector. It’s a great way to learn how to edit YouTube videos for free. After 30 days, you can sign up for the affordable premium version, or stick with the slightly limited free version, depending on your editing needs.
A YouTuber can make anywhere from $1,000-$6,000, for 1 million views, with most making around $2,500. The huge disparity in earnings is due to a variety of factors, including ad quality, the number of clicks an ad receives, video length, and even the country where your channel is based.
Your video will only make money, however, if you join the YouTube Partner Program, outlined in the answer to #7 below.
To get paid by YouTube you have to join the YouTube Partner Program. The criteria for being accepted into the Partner Program are as follows:
- Your channel has at least 1,000 subscribers
- Your channel has reached 4,000 valid public watch hours in the past 12 months
- You adhere to YouTube’s Community Guidelines
- You have agreed to the terms and conditions
- You signed up for an AdSense account
- You live in a region where the Partner Program is available
Once you are in the YouTube Partner Program, you can make money from a variety of revenue streams, including:
- Number of views
- Advertisements that play before and/or during your video
- Sponsorships (collaborations between a brand and a YouTuber)
- Merchandise
- Affiliate Marketing (promoting products in your videos through affiliate links)
- Creating and promoting exclusive content on a subscription-only platform such as Patreon
Yes, almost all creators know how to edit YouTube videos, and do it themselves when they are starting out. Even some of the very famous YouTubers still edit clips themselves, either because they like having complete control over their content, or because the turnaround time for recording, editing, and posting is extremely tight.
YouTube pays based on views, not subscribers.
You may be wondering why YouTubers are constantly asking viewers to subscribe if they aren’t getting paid per subscriber. First of all, subscribers get your videos directly on their homepage, making it easier for them to click on your new content and raise your viewer numbers. A large number of subscribers is also a sign to potential viewers that your content is worth checking out. YouTubers can also use a large subscriber number to pitch themselves to brands for sponsorships.
It depends on the type of videos the YouTuber makes. For instance, gamers and vloggers who often record in front of the computer use a webcam to record their videos. YouTubers who make videos with a lot of action typically use action cameras such as a GoPro.
A DSLR or mirrorless camera will give you the best quality but are the most expensive options. Therefore, most YouTubers who are just starting out use a less expensive camcorder. This is a perfectly good option for recording videos for YouTube, as long as the camcorder records at least 1080p.


