Introduction to Blending Modes in PhotoDirector 9
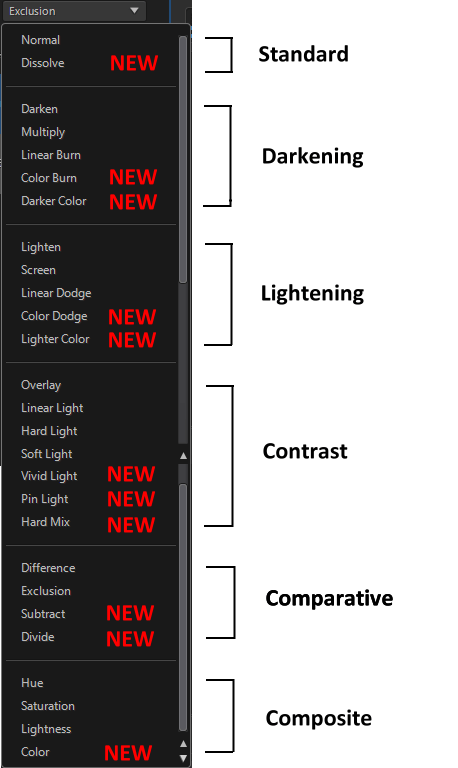
The Blend modes in PhotoDirector offer added power to Layers. By taking colors of one image and blending it to another image layer, Blend Modes lets you create new effects. In PhotoDirector 9, we have added 9 new blending effects (total 27). each contains an algorithm to blend color pixels of the base image and the blending image, resulting in different look and feel.
By default, the blend mode is set to normal, meaning simply one layer is on top of another, by clicking on the drop-down menu, you will find the blend modes grouped into 6 categories.

To take the blending modes even further, you can adjust opacity values to decide how strong you want the look to be. Adjusting the Opacity slider allows you to blend the active layer (making it translucent) with the base layer, which in turn allow the base layer to see through.
Any changes made using blend modes are non-destructive, you can always readjust your blend mode settings without damaging the pixels in your original image.
In the following, we will display the effect of each blending mode using a photo and applying 2 different textured images to help you understand the effect of each blend mode.
Original Background Image

Original Blend images

Normal
|
NEW Dissolve
|
|---|---|
NEW Darker Color
|
NEW Color Burn
|
Darken
|
Multiply
|
Linear Burn
|
|
NEW Color Dodge
|
NEW Lighter Color
|
Lighten
|
Screen
|
Linear Dodge
|
|
NEW Vivid Light
|
NEW Pin Light
|
NEW Hard Mix
|
Overlay
|
Linear Light
|
Hard Liight
|
Soft Light
|
|
NEW Subtract
|
NEW Divide
|
Difference
|
Exclusion
|
NEW Color
|
Hue
|
Saturation
|
Lightness
|
Each effect doesn't just stops here. Any blending mode applied to a background image can be further adjusted with the opacity slider, gradient and color tools. More tutorials to come on how to use Layers and Blend modes for creative effects.
PhotoDirector 2026 Essential
Free Software With 30-Day Premium Features


