How to Create a Glitch Effect in Photos & Videos [Step-By-Step Guide]

Glitch art is the practice of digitally altering photos and videos to create waves, shifts, lines, jumpy movements, and other visual errors. While many artists create video and photo glitch art by removing lines of code from the media, you can easily achieve a similar effect using video or photo editing programs.
We’ve created this step-by-step guide to give you all the information you need to achieve photo and video glitch effects from your smartphone, tablet, laptop, or desktop computer. Read on to learn how to make a glitch effect in your images and videos.
- How to Create a Video Glitch Effect on iOS and Android
- How to Add a Video Glitch Transition on iOS and Android
- How to Create a Video Glitch Effect on Windows and Mac
- How to Add a Video Glitch Transition on Windows and Mac
- How to Create a Photo Glitch Effect on iOS and Android
- How to Create a Photo Glitch Effect on Windows and Mac
- Best Apps to Create Glitch Effects in Videos and Photos Free Download
- How to Create a Glitch Effect FAQs
How to Create a Video Glitch Effect on iOS and Android
One of the easiest ways to create a glitch effect in your videos is to use a mobile video editing app. While you can find dozens of video editors in the Google Play and Apple app stores, in this tutorial we will be using the PowerDirector app.
Download the app above and follow these steps to create a video glitch effect:
- Upload your video into the PowerDirector app: When you first open PowerDirector, you will see the option to create a New Project. Tapping this button will take you to a screen to upload videos from your camera roll.
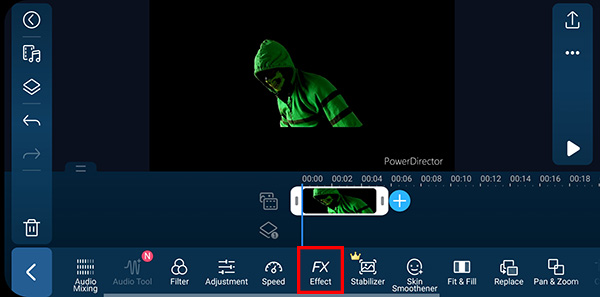
- Tap the Effects button at the bottom of the page: Once you have your video on the timeline, tap the Effects button at the bottom of the screen.
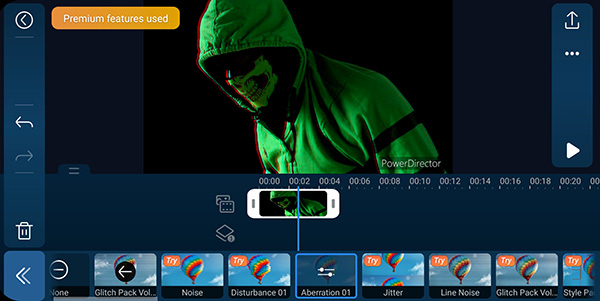
- Browse the effects in the Glitch Pack: You will see Glitch Pack Vol 1 & 2 under the Effects tab. You can test the effects of these packs on your video by tapping on them. Remember, you can always undo to restore your video to its original state.
- Adjust glitch setting: After applying a glitch effect to your video, you can adjust its settings by tapping on it again.
- Save and export your video: Once you’ve applied the perfect glitch effects to your video, you can save it to your phone or export it directly to your favorite social media platforms.

How to Add a Video Glitch Transition on iOS and Android
Instead of adding a glitch effect or overlay to your video, you can also achieve a trippy appearance by inserting a video glitch transition between two clips. This transition effect can give your video a psychological or horror impression, encouraging your viewers to keep watching to see what happens next.
Adding a glitch transition is also an effective way to piece together two clips that may not look cohesive. For example, you can insert a glitch transition that makes it look like the video camera glitched, removing some footage and jumping to the following clip.
Using the PowerDirector app, you can add a glitch transition to your video right from your phone or tablet. Follow these steps to insert this transition effect:
- Open the PowerDirector app and import your videos: As in the last section, your first step is to upload the videos you would like to edit into PowerDirector. Because you are adding a transition, you will need to have two separate video clips. You can either cut one video into two clips or piece two different clips together.
- Add your clips to the timeline: Next, you’ll need to place your clips side by side in the timeline. If you are using one continuous video, you can split it into two clips by dragging the blue pointer to your desired placement in the video, then clicking Split.
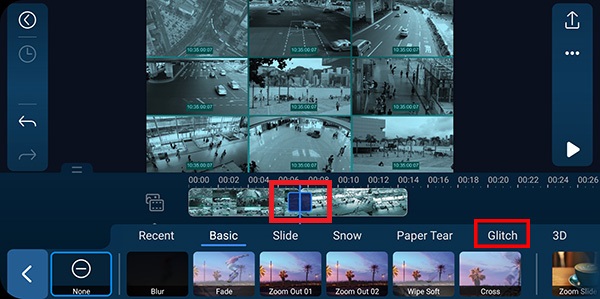
- Click the transition icon between your clips: The app automatically places a small transition icon between video clips in the timeline. Clicking this icon will open a window with the transition library.
- Insert a glitch transition: Next, scroll through the transitions until you find a glitch transition you like.
- Save and export your video: Finally, you can save and export your completed video.

How to Create a Video Glitch Effect on Windows and Mac
You can also add a glitch effect to videos using a desktop editing program. Desktop editors tend to have more features than mobile apps, allowing you to achieve more professional-looking results. Additionally, desktop editing programs often allow for more precision and fine-tuning throughout your editing process.
While you can add glitch effects through many video editing programs, we recommend using PowerDirector for Windows and Mac. The program is easy to use, even if you have no editing experience.
Here’s how to make video glitch effects with PowerDirector for Windows and Mac:
- Upload your video and drag it to the timeline: First, import your video into PowerDirector. Then, drag it from the library down to the timeline, allowing it to snap into place.
- Navigate to the Effects room: Once you have your video in the timeline, you’ll want to navigate to the Effects Room. You can do so by clicking the fx icon on the left-hand side of the screen.
- Open 3rd Party: Next, you’ll see a list of effect dropdowns. Click the 3rd Party dropdown.
* On Mac: You’ll see a list of effect dropdowns. Click the Style Effect dropdown and select Glitch. - Choose Glitch: Finally, select the glitch effect and add it to your footage by dragging and dropping it on top of it.
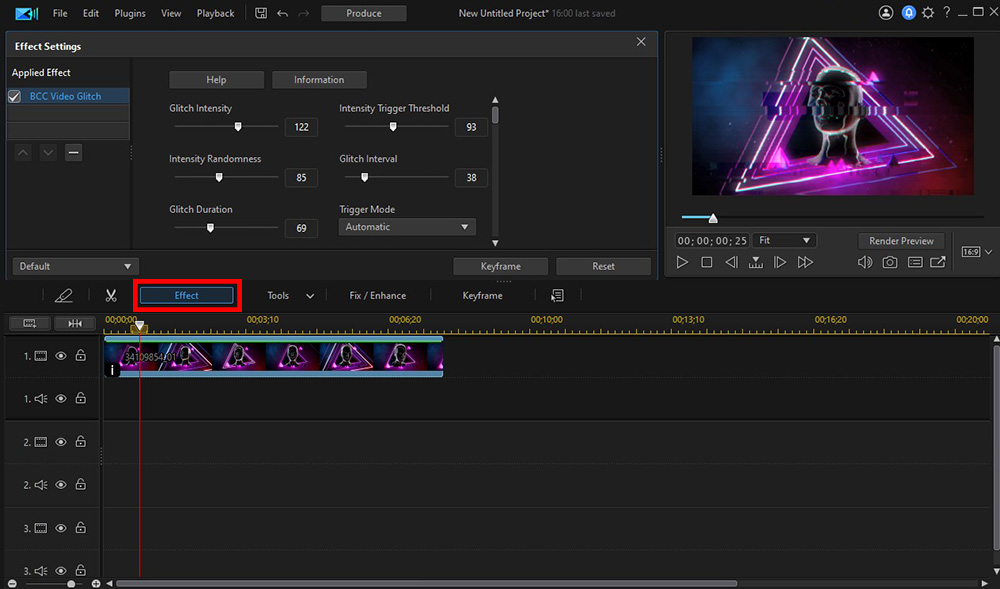
- Adjust the effect using the sliders: With your clip selected open the Effect menu and adjust the settings of your glitch.
- Save and export your video: Finally, you can save and export your completed video.

How to Add a Video Glitch Transition on Windows and Mac
Adding a glitch transition between video clips is another fun way to distort your video without masking any actual footage.
As with the PowerDirector app, you can use the PowerDirector desktop program to insert video glitch transitions between two video clips. Simply follow these steps to add your glitch transition:
- Upload your video clips to PowerDirector: If you would like to add a transition to your video, you will need to have at least two video clips or will need to add the transitions to the beginning or ending of your clip.
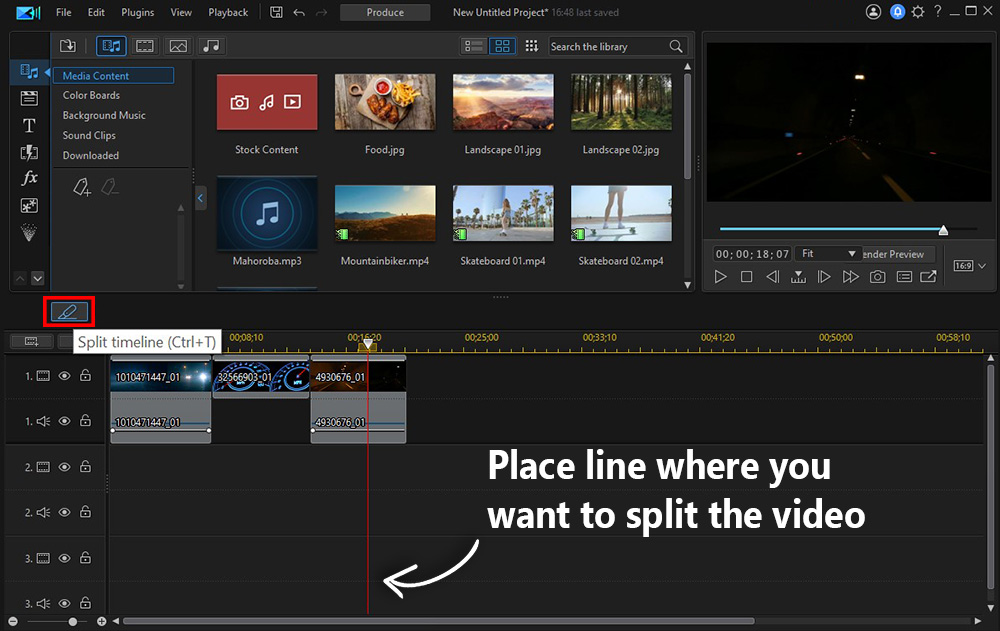
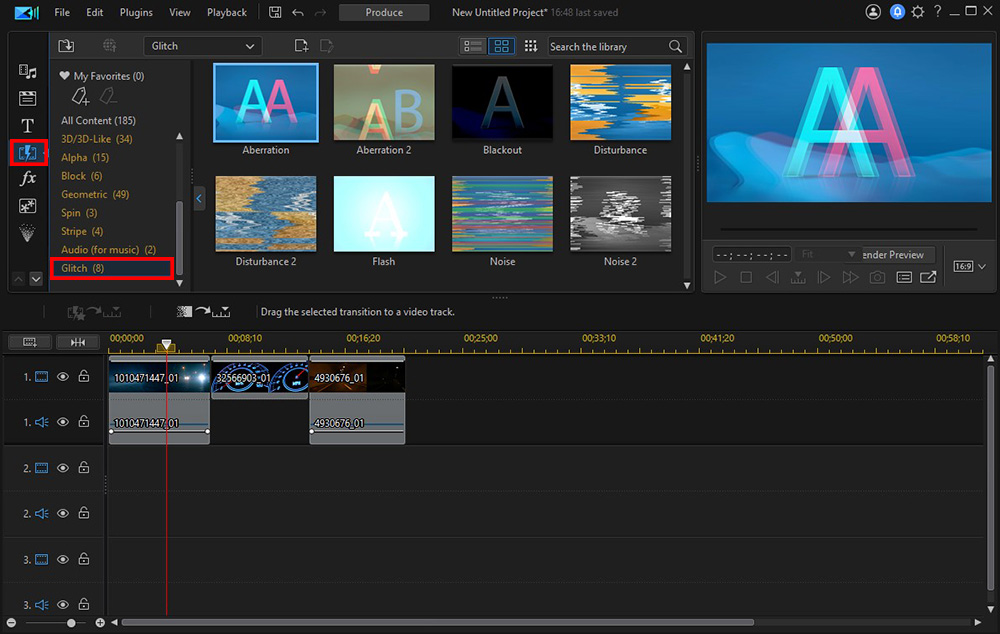
You can either upload two different clips or split one clip into two pieces. If you’d like to split your clip, you can do so by adding it to the timeline, positioning the slider where you would like to divide the clip, then clicking the Split button above the timeline. - Open the Transition Room: Open the Transition Room by clicking on the icon that looks like a video frame with a lightning bolt over it on the left side of the program.
- Open the Glitch Transitions: On the left-hand side of the Transition Room window, you will see a list of all of the transition groupings. Next, search for Glitch and select it.
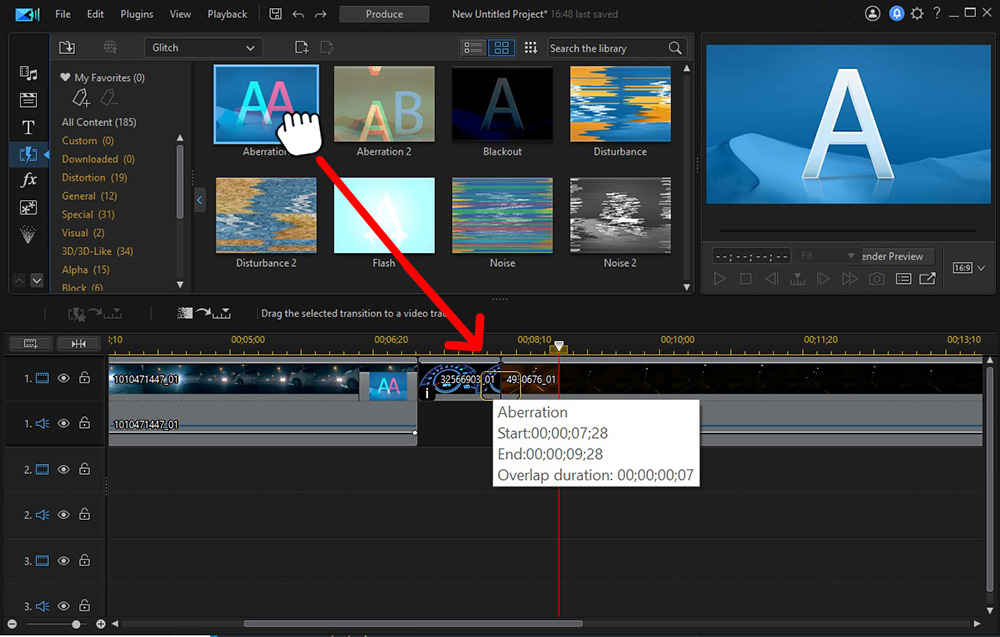
- Drag your glitch transition to the timeline: Feel free to test out any transitions in the glitch pack. You can add these transitions between your clips by dragging them to the timeline in your desired placement at the beginning or end of any clip.
- Save your changes and export your video: Once you have added all of your desired transitions to your video, you can save your changes and export the video to your computer.
How to Create a Photo Glitch Effect on iOS and Android
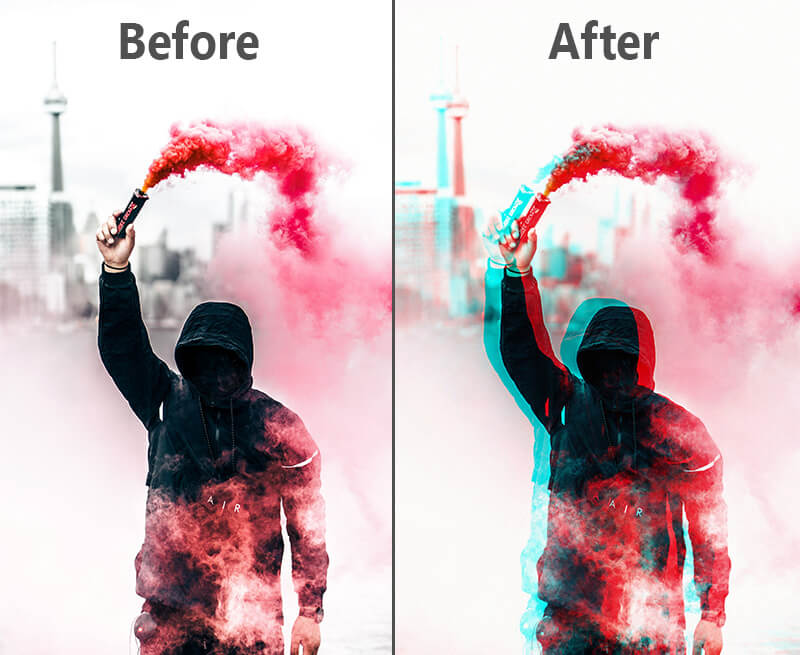
Photo glitch effects can make your images look like they failed to load or a software bug infected them, giving them a distorted appearance with wavy lines and discolorations. These effects offer an easy way to spice up your photos and make them stand out from the other images on your social media feed.
One way to achieve a photo glitch effect is to use an editing app. You can find several glitch effect apps in your app store that allow you to apply various glitch-like effects to your photos. However, if you’re looking for a higher-quality editor that you can use for all of your editing tasks, try PhotoDirector.
Here’s how to do a glitch effect with PhotoDirector for iOS and Android:
- Upload your photo to the PhotoDirector app: First, select the image you would like to glitch, then upload it to PhotoDirector.
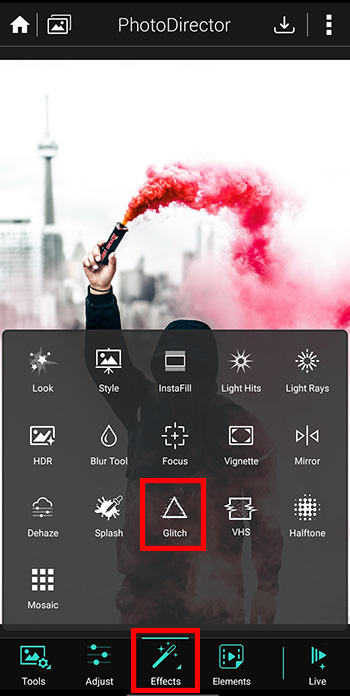
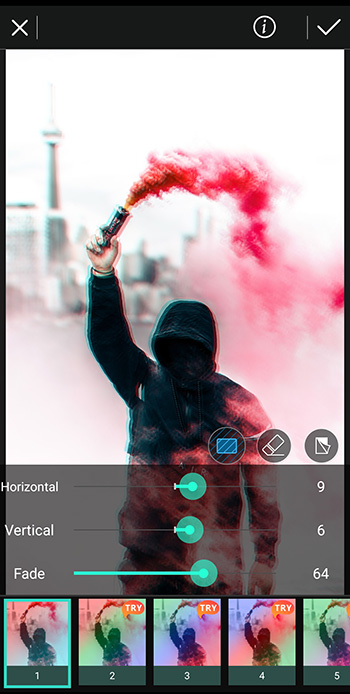
- Navigate to the Effects tab: Next, click the Effects button at the bottom of the app. You will now be able to scroll through all of the photo effects included in PhotoDirector. You can test these effects by tapping on them.
- Click the Glitch effect: You should see a Glitch effect in the list of built-in photo effects. Clicking on the Glitch effect will add a distorted, wavy filter over the photo, making it appear as if it has glitched.
- Adjust the effect: Once you click on the Glitch effect, you will see a slider appear above the effects icons. You can drag this slider to adjust the effect’s intensity.
- Save and export your image: When you finish editing your photo, you can export it to your favorite social media page or save it to your camera roll.
How to Create a Photo Glitch Effect on Windows and Mac
If you’d like to add glitches to your photos on your computer, we recommend using the PhotoDirector desktop program instead.
PhotoDirector for Windows and Mac is just as user-friendly as the PhotoDirector mobile app, but it includes more advanced editing tools and effects. For example, the program features Video-to-Photo tools for creating animated GIFs, multi-exposure photos, and panoramas.
If you’re looking to apply a cool glitch effect to your image with PhotoDirector, you can follow these steps:
- Import your image into PhotoDirector: Your first step is to upload your photo. You can upload a range of image file types into the PhotoDirector desktop program.
- Navigate to Guided: Next, click the Guided tab at the top of the editing window. Doing so will take you to PhotoDirector’s guided editing tools and effects.
- Select Photo Effects: Under the Guided tab, you should see a button to navigate to the built-in Photo Effects.
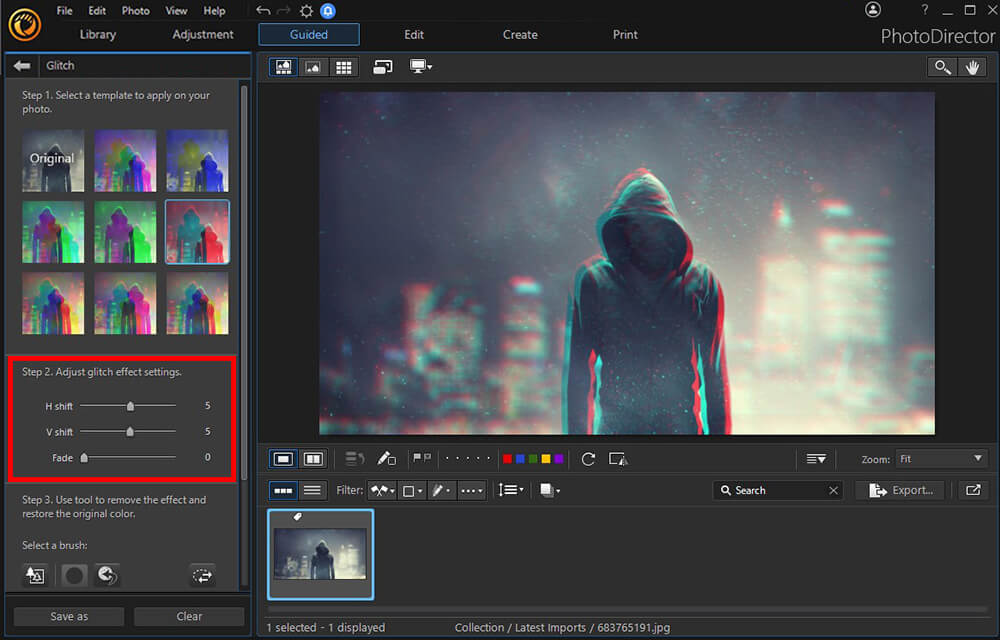
- Click Glitch Effect: Next, select the Glitch Effect button to see all of the glitch-like effects. You can test each effect by clicking on them.
- Adjust the glitch effect settings: Once you’ve chosen your desired effect, you can customize the H shift, V shift, and fade using adjustment sliders.
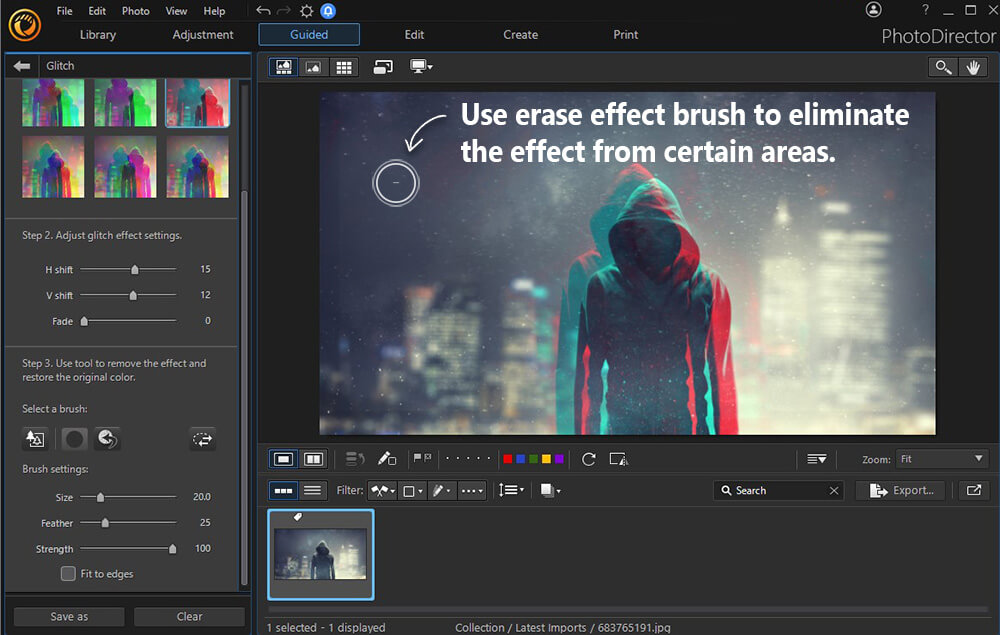
- Limit the effect parameters: If you’d like to confine the glitch effect to a specific portion of the photo, you can use the erase effect brush to eliminate the effect from certain areas. Simply select this brush icon, then click and drag your mouse over the places you want to erase.
Best Apps to Create Glitch Effects in Videos and Photos Free Download
Applying a glitch effect to your photos and videos doesn’t require much editing expertise. You only need to follow a few simple steps to achieve these effects within your pictures and videos. PowerDirector and PhotoDirector take most of the work out of editing your videos and images, saving you time while creating a clean, professional result.
If you’re looking for a fast way to apply these effects, you can use the mobile versions of PowerDirector and PhotoDirector. However, if you’d prefer the precision that comes with a larger editing platform, you may want to use the desktop versions instead.
Download PowerDirector and PhotoDirector for free today to try these effects for yourself.
How to Create a Glitch Effect FAQs
1. What is Glitch Art?
Glitch art is a form of digital art in which artists alter the makeup of photos and videos, making them look distorted and broken. This art form has become more popular in the last decade, as many artists view it as a reflection of the rise of digital media and a reminder that technology is not perfect.
2. How Do I Make Glitch Art?
Typically, glitch artists create actual glitches in photos and videos. For example, some artists import their images into glitch software that they can use to remove lines of code, destroying portions of the picture.
However, you can achieve a similar result by applying glitch effects to your media using editing programs like PowerDirector and PhotoDirector. Simply follow the steps in our guide to glitch your photos and videos using these programs.
3. Are There Different Types of Glitches? What Are They?
Artists use numerous techniques to achieve glitch-like appearances in their photos. The most common include these types of glitches:
- Pixelation: Pixelating a portion of your photo can make that section appear blurry, the same way an image would look if you zoomed in.
- Color degradation: Many glitch effects also distort and degrade the images’ colors, blurring and blending the hues. This effect resembles the glitches that occur when an image fails to load fully.
- Lines: Adding horizontal, vertical, and wavy lines to a photo is another way to mimic a glitched image.
4. What Are the Best Video Glitch Makers?
You can find dozens of video editing programs for mobile devices and computers that you can use to add glitch effects to your videos. However, some programs are higher quality and more reliable than others.
Here are the best video glitch makers for iOS and Android:
- PowerDirector
- Glitch Wizard
- Groovo
- Glitch Video Effects
- GlitchFX
And here are our top glitch effect editing programs for Mac and Windows:
- PowerDirector
- Veed.io
- Photo Mosh
- Shotcut
- VSDC
You can learn more about these programs by checking out our Best Video Glitch Effect Makers [Windows, Mac & App] article.
5. What Are the Best Photo Glitch Makers?
You can also use various programs to create photo glitch effects. Here are our top choices for iOS and Android:
- PhotoDirector
- YouCam Perfect
- Glitch Art Studio
- Glitch!
- Glitch Lab
And here are the best options for Mac and Windows:
- PhotoDirector
- ImageGlitcher
- Glitch FX
- ImageGlitch
- Photoshop
Check out Best Photo Glitch Effect Makers [Windows, Mac & App] for more information.
6. What Features Should I Look for in a Glitch Effect Maker?
Here are the essential features to look for in a photo glitch effect maker:
- Several realistic glitch effects
- Crop, rotate, and resize tools
- User-friendly selection tools (rectangular marquee tool, move tool, select layer tool)
- Support for several file formats
- AI-powered smart effects


