How to Edit a Picture-in-Picture Video for Free [Windows, Mac]

Picture-in-picture (PiP) video effects allow you to overlay one video onto another, displaying both videos simultaneously. These effects can help keep viewers interested in your video footage, allow you to include reference videos within another video shot, and place moving elements within your videos — all of which can enhance engagement.
However, if you’ve never edited a picture-in-picture video before, you may be intimidated by the process. You may also be wondering if you need expensive video editing software to create this effect.
Thankfully, achieving picture-in-picture effects may be easier and more affordable than you think. Read on to learn how to edit video picture-in-picture effects with PowerDirector, the best free video editor with PiP effects.
- What is Picture-in-Picture Video Editing?
- Best Picture-in-Picture Video Editor
- How to Edit a Picture-in-Picture Video
- How to Customize a Picture-in-Picture Video When Editing
- Tips for Picture-in-Picture Video Editing
- Download the Best Picture-in-Picture Video Editor for Free
- Editing Picture-in-Picture Video FAQ
What is Picture-in-Picture Video Editing?
Picture-in-picture video editing is the process of overlaying one video onto the footage of another video. This effect allows you to display two or more videos within a single frame.
You may see this video editing effect under a few different names, such as:
- Picture-in-picture effect
- Video-in-video effect
- Video overlay effect
- Split-screen
You may also see these terms in reference to the practice of playing a video in the corner of your screen while visiting other web pages on your device. For example, YouTube allows you to watch a video in the bottom corner of your phone screen while navigating to other apps.
However, this article discusses the picture-in-picture video editing effect, which overlays a video onto an existing video within the editing phase. When viewers watch these videos, they will not be able to separate them, as all of the video footage will be contained within the final footage.
PiP technology has been around since the 1980s when Philips began offering this feature in its high-end televisions. However, casual video editors have only been able to achieve this effect within the past few decades through at-home editing software.
One of the most common uses of picture-in-picture video editing is within online schooling. For example, professors can record video footage of themselves writing equations on a board, then include smaller videos of their faces in the bottom corner of the footage, allowing them to discuss the equations aloud.
Content creators also use the picture-in-picture effect to place small motion graphics in their videos. For example, you can use this effect to add an animated “Like and Subscribe” graphic to the bottom-right corner of your social media video.
You may also want to use a picture-in-picture effect to show viewers a video you’re referencing within your own video. For example, let’s say you want to create a video discussing the most recent NBA game. You can use the picture-in-picture effect to place scenes from the game in the corner of your video as you discuss them.
PiP effects have endless uses. Once you learn how to achieve this effect, you’ll be surprised by how often you think to use it within your video editing process.
Best Picture-in-Picture Video Editor

PowerDirector
With its easy-to-use PiP designer tool and built-in animations, PowerDirector makes PiP editing a breeze. You can upload your own PiP objects or choose from the program’s extensive library, edit the objects’ properties, then overlay them onto your existing video in a few simple steps.
How to Edit a Picture-in-Picture Video
PowerDirector makes picture-in-picture editing easy, whether you’re a beginner or a professional video editor. The program includes a designated PiP Designer tool that simplifies the process of adding animations, images, and videos to your existing footage. This tool also allows for complete customization of the object’s properties, giving you full power over your final video.
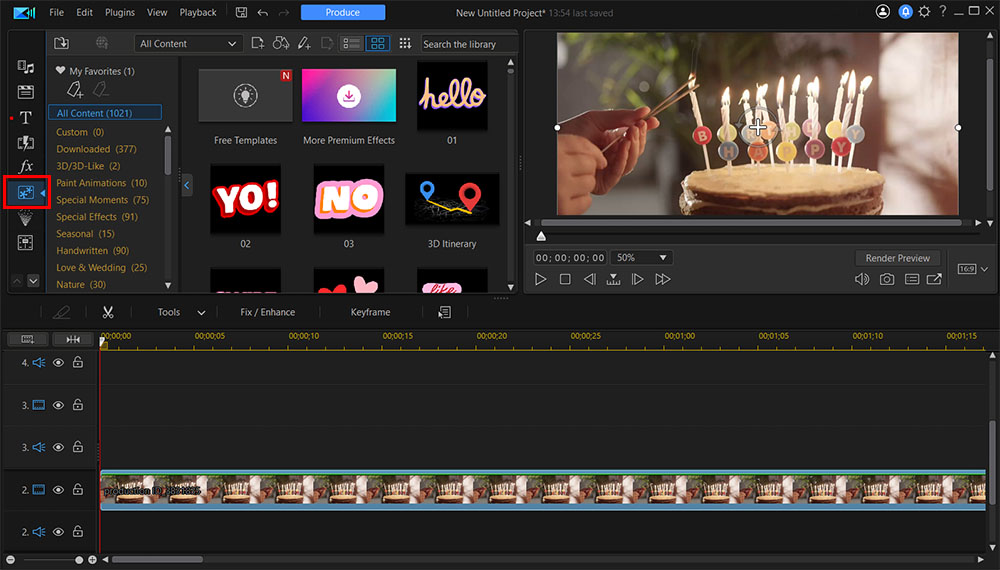
You can follow these steps to add video overlays from the PowerDirector library to your video.
- Open PowerDirector and upload your background video to the program.
PowerDirector is compatible with a wide range of video formats, including WMV, MOV, DV-AVI, MPEG01, MPEG-2, and more.

We recommend previewing a few objects until you settle on the perfect choice for your video.
How to Customize a Picture-in-Picture Video When Editing
You can customize the picture-in-picture objects in the PowerDirector library to suit your video. Here are the steps you can follow to customize these animations:
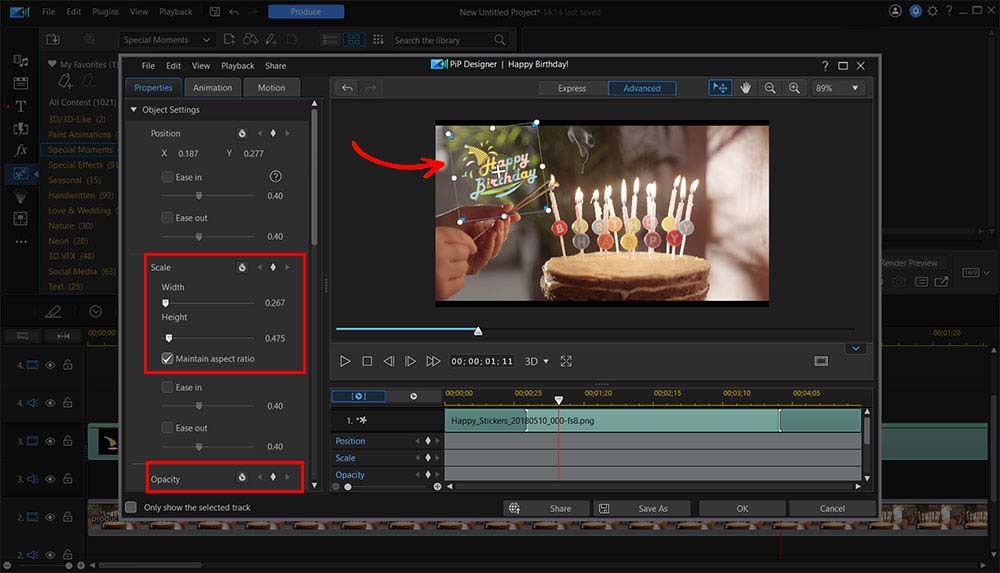
- Double click on the picture-in-picture object you dragged to the timeline in the tutorial above and the PiP Designer will open.
- Click the Play button to preview the object's default state.
- Drag the object within the preview window to change its position in the final video.
- Drag the object's corners in the preview window to adjust its size.
- Use the sliders on the left-hand side of the screen to adjust the position, scale, opacity, rotation, and other metrics.
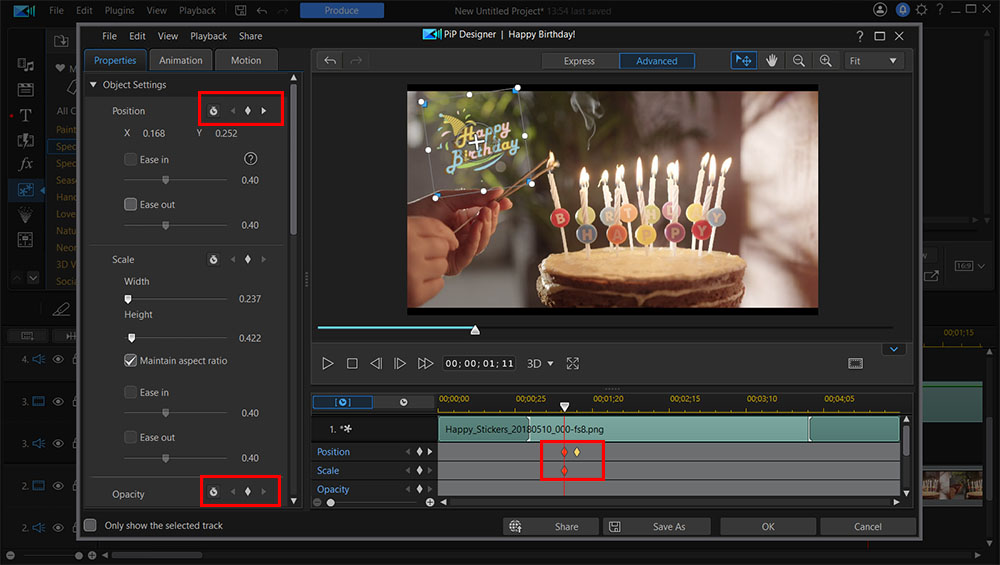
- Add keyframes to adjust the properties at specific animation frames.
- Place keyframes throughout the timeline to adjust the properties throughout.
- Click OK to save your changes. PowerDirector will apply the changes to the PiP object.
- Save and export your video in your desired format.

For example, you can add a keyframe at the start and one second in and adjust the opacity to make it look like the object has disappeared.
For example, you can place a keyframe at the beginning, middle, and end of the timeline, then vary the object position at each point. Then, when you preview the object, you will see it slowly move from one place to the next throughout the video.

Tips for Picture-in-Picture Video Editing
Tip 1: Choose a picture-in-picture object that doesn’t take away from the background video.
Your picture-in-picture object should add to the intrigue and excitement of your background video — not take away from it. As a result, when you edit your PiP object in the PowerDirector PiP Designer, be sure to keep your background video as the primary focus. A few ways to accomplish this include:
- Lowering the opacity of the PiP object to allow the background to show through
- Placing the PiP object in the corner instead of the middle of the footage
- Only including the PiP object for a few seconds rather than the total duration of the background video
While your PiP object should catch your viewer’s eye, they should still be able to focus on the rest of the video while keeping the object in mind.
Tip 2: Upload your own PiP objects into the PowerDirector library to enhance customization.
If you’d like to overlay a specific video onto your background video, you can upload it into the PowerDirector library and add it to your footage. Simply follow these steps:
- Upload your background and PiP video files into the PowerDirector library.
- Drag the background video to the timeline.
- Drag the PiP video below the background video in the timeline. This will make the PiP video the top layer, allowing it to appear above the background video.
- Adjust the size of the PiP video by dragging the corners in the preview window.
- Adjust the position of the PiP video by dragging it to your desired placement in the preview window.

You can then edit both of these video clips using the full suite of PowerDirector editing tools.
Tip 3: Use PiP Objects As Transitions Between Clips
If you’re looking for a creative way to transition between two clips in your video, we recommend testing out a PiP object as your transition.
For example, you can position the object in the timeline so that it overlaps with the end of the first clip and the beginning of the following clip, leaving a small gap between the background clips. Then, you can adjust the object’s opacity and keyframes so that it fades in and out between your footage.
Using PiP objects as transitions can allow you to break up your footage into practical sections without giving viewers a reason to decrease engagement with the video.
Download the Best Picture-in-Picture Video Editor for Free
Including PiP video effects in your footage is an excellent way to highlight multiple videos in a single shot, draw viewers’ attention to an object or action, and stay engaged throughout your entire video. Thankfully, achieving this effect is simple with PowerDirector.
PowerDirector features an easy-to-use PiP Designer room that allows you to add animations to your video footage and customize them in a few simple steps. You can also upload your own PiP footage to overlay onto your video, then adjust its positioning right in the preview window.
Along with these intuitive picture-in-picture tools, PowerDirector includes a range of other professional-level editing tools, effects, and features that you can use to transform your video footage.
Download PowerDirector for free today to try these impressive tools for yourself.
Editing Picture-in-Picture Video FAQ
1. How Do I Edit a 360 Picture-in-Picture Video?
PowerDirector makes it easy to add picture-in-picture effects to 360-degree videos as well. You can follow these steps to achieve this effect on your 360-degree video footage:
- Open PowerDirector and import your 360-degree video into your timeline.
- Select the Video Overlay (PiP Objects) Room icon on the left-hand side of the window.
- Preview the built-in PiP objects, then drag your desired object below your 360-degree video in the timeline.
- Drag the object horizontally across the timeline to change the timestamp where it appears in the 360-degree video.
For example, if you’d like the object to appear near the end of the footage, drag the timeline box for the object to the far right side, near the end of the timeline box for the 360-degree footage. - Customize the PiP object by adjusting the opacity, position, size, scale, rotation, and other properties using the editor.
- Save your changes and export your video.
Tip: We recommend keeping your object near the center of the preview window to avoid distortion once you convert your video back to 360 degrees. If you place your object near the top or bottom of the footage, it may not look clear in the final product.
2. How Do I Change the Speed of a PiP Effect?
Using one of PowerDirector’s built-in PiP effects can save you time and allow you to achieve a high-quality finish within your video footage. However, you can also customize these built-in effects to optimize them for your type of video footage.
For example, speeding up or slowing down the animation within these effects can add a more exciting or dramatic appearance to your footage, inviting viewers to watch more closely. You can follow these steps to change the video playing speed of a PiP effect with PowerDirector:
- Click on your desired PiP object and drag it to the timeline below your background video.
- Select Speed to open the speed option panel.
- Drag the slider to adjust the speed. You can adjust the speed between .1x and 10x the original rate.
- Preview your changes by clicking Play below the preview window.
- Close the speed option panel, then save your changes and export your footage.
3. How to Use Motion Tracking When Editing a Picture-in-Picture Video
Motion tracking is a video editing effect that allows you to follow a moving object within your video. For example, you can add a PiP object that uses motion tracking to follow the same movement pattern as a person jumping off a ledge or riding their bike.
Using motion tracking with picture-in-picture effects is an excellent way to keep the viewer’s eyes trained on the PiP object. You can follow these steps to achieve this effect with PowerDirector:
- Upload your background video to PowerDirector and drag it to the timeline.
- Click the Tools dropdown above the timeline, then select Motion Tracker.
- Drag the playhead to the location in the video where the motion you would like to track begins.
For example, if you’d like your object to follow a person’s movements, you can drag the playhead to the timestamp when the person enters the scene. - Drag the edges of the box in the preview window to fit around the object you would like to track.
- Click Track above the timeline. The box you created will move along with the object or person in the footage.
- Click Stop when you would like PowerDirector to stop tracking the motion.
- Click the PiP icon on the left-hand side of the screen.
- Import the media clip you would like to use in your picture-in-picture overlays.
- Drag the object to your desired position in the preview window.
4. What Is the Best Picture-in-Picture Editing App?
If you’d like to overlay videos onto other videos using your phone, the PowerDirector mobile app is your best option. This app includes many of the same features as the PowerDirector desktop program, including intuitive, user-friendly navigation to make complex edits from your mobile device. You can create a picture-in-picture effect with this app just like you could on your computer.
The PowerDirector mobile app also includes a range of other impressive features, such as:
- Hollywood-style special effects
- Chroma key tools
- Video stabilization effects
- Flawless transitions
- Double-exposure effects
- And more!


