How to Edit Videos for Beginners [Includes Templates]

If you are starting a YouTube channel, one of the most important things you’ll need to learn is how to edit videos. While most of us can point a camera and hit “record,” not everyone can turn that raw footage into a video that will gain followers.
If you want to learn how to edit videos for your YouTube channel, you’ve come to the right place. This article will give you step-by-step instructions for how to edit videos on your desktop. Even if you are brand-new to video editing, you can make professional-looking videos to grow your channel and earn you money in no time at all.
- What You Need to Know Before You Start Editing Your Video
- Best Free Video Editor
- How to Edit Videos With PowerDirector
- How to Create an Intro With Templates
- How to Add Transitions in Between Clips
- How to Crop a Video
- How to Add Text to a Video
- How to Add Special Effects to a Video
- How to Create an Outro With Templates
- How to Produce Your Video and Export it Directly to YouTube
- Dos and Don’ts of Video Editing
- Download the Best Video Editor for Free
- Video Editing FAQ
What You Need to Know Before You Start Editing Your Video
Here are some things you need to know when learning how to edit videos that will tighten your workflow and save you valuable time.
Read the YouTube Community Guidelines
We recommend becoming familiar with theYouTube Community Guidelines while you are in the early stages of developing your YouTube channel. You don’t want to waste time and money shooting videos that violate YouTube’s rules. And if monetization is your goal, make sure you read the separate guidelines that apply to monetized channels.
When your videos go against YouTube guidelines, your channel receives a strike and you will be unable to post anything for a week. 3 strikes in one month can get your channel permanently banned.
Obey the 321 Rule
The 321 rule means having 3 separate copies of every video file. You don’t want to lose work you spent hours perfecting because of a computer glitch or corrupted file. We recommend backing up your work on the hard drive of your computer, in cloud storage, and in an external hard drive or flash drive.
This will also help when you have tons of videos that you need to store but don’t have space on your desktop. Keeping videos around even after you’ve posted them is a good idea, in case you want to do a highlight reel or re-edit them in the future.
Edit for a Story
YouTube is an outlet for visual storytelling. The goal is to elicit an emotional response in your viewers, even if you are editing a day-in-the-life Vlog, photo slideshow, or how-to video.
You may not think of those types of videos as having a story, but a good editor can bring out a story in any footage. Sometimes a documentary crew shoots hundreds of hours of footage, having no clue which way the story will go. It is the job of the editor to dig through the footage and pull out the story. Your daily vlog may not leave you with hundreds of hours to sift through, but it is still your job to find the story and edit accordingly.
Think of a photo slideshow a couple wants to play at their wedding. At first, it seems like only placing photographs of two people in a collage and setting it to music. But looking through the photos you realize how different their personalities are, or the different circumstances of their upbringing. Show the juxtaposition side by side, these two completely different people, living separate lives. Finally the two meet and the slideshow changes to pictures of the two of them together. With the right song playing in the background, you’ll have the audience in tears, or crying with laughter.
Maybe you make time-lapse videos of yourself drawing. Your music could start out calm, then get dramatic and loud as you are reaching the end of your drawing. It is possible to send your viewers on an emotional journey, even with little or no drama.
Choose the Right Software
Using the right software to edit your videos can make or break a project. The first thing to think about when choosing video editing software is ease-of-use. Software that is too difficult for your skill level will add hours to the editing process. Even if it is powerful and pro-level software, if you don’t know how to use it properly, your work will suffer. Conversely, if you choose software that is too simplistic you may be frustrated by the lack of control you have over the edit.
There are many video editors out there, and many cater to specific editing needs. Some are heavy in visual effects, while others offer only basic cutting tools. Some are geared toward action footage and offer tools such as video stabilization and slow-mo effects. Some have royalty-free music and sound effects libraries and others do not. Make a list of key features you often need in your video projects and make sure your software has these tools.
Best Free Video Editor

PowerDirector - Best Overall Video Editor
PowerDirector is the perfect software for beginners. It is user-friendly and offers guided edits, tutorials, and ready-to-go templates to make editing your first videos quick and easy. And PowerDirector is packed with features, so it will grow with you as you become an editing expert.
Download PowerDirector by clicking the button below, then keep reading to learn how to edit videos for beginners.
How to Edit Videos With PowerDirector
Now we will get into how to edit videos using the beginner-friendly video editor PowerDirector.
Before you learn how to edit videos, you need to import your video clips. Open PowerDirector and click the Import Media icon in the top left. Choose Import Media Files, or Import a Media Folder. Then choose your media files/folder and click Open.
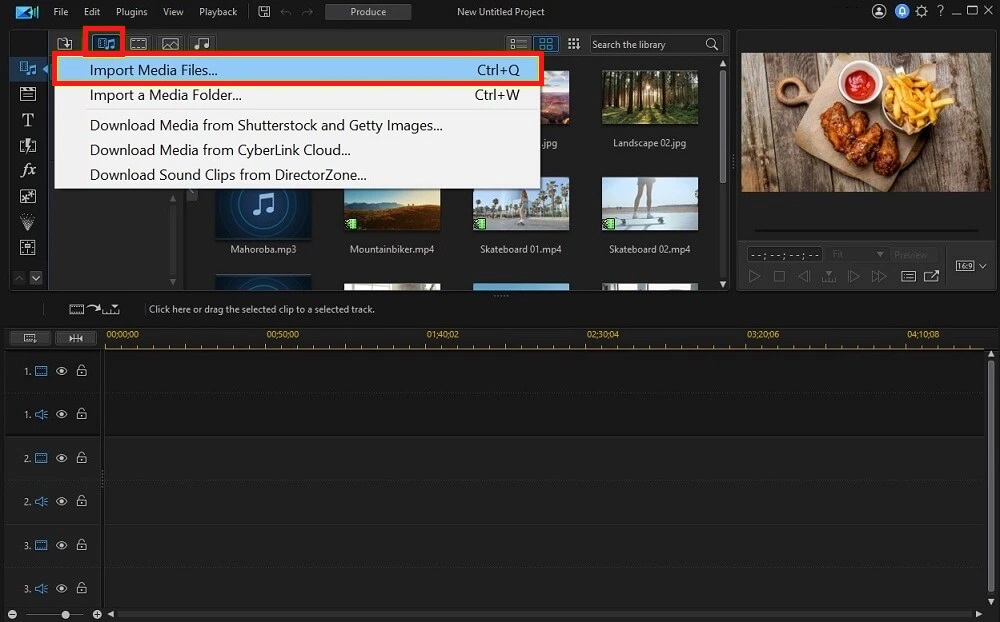
Drag your clips onto the Editing Timeline in the correct order.
Now you are ready to edit clips with our guides below.
How to Create an Intro With Templates
All YouTube videos need an intro. A good YouTube intro is about 8-30 seconds long, includes your channel’s logo, and represents the feel of your channel. Keep reading to learn how to edit videos with a YouTube intro.
- Navigate to the top left toolbar, and find the Intro Video Room icon that looks like a play button with three dots underneath.
- Scroll through the categories and find the one that best describes your channel (such as Beauty or Gaming).
- Browse the available templates until you find an intro design you like, then double-click it.
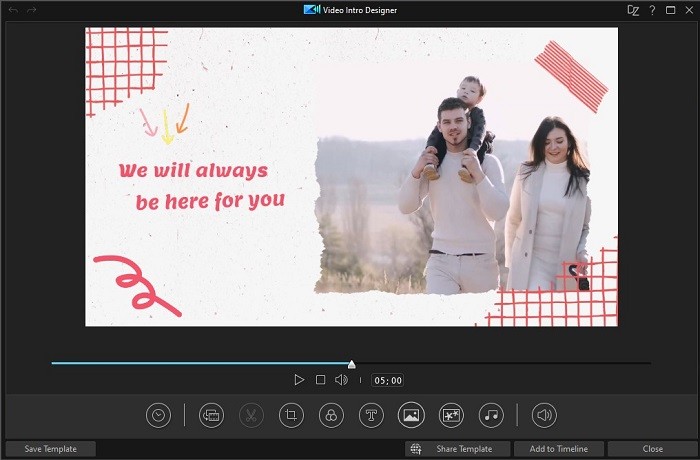
- Customize the template in the Intro Video Designer. Click on any element in the preview window to edit it.
- When you are done with your intro, add it to your timeline at the beginning of your video.

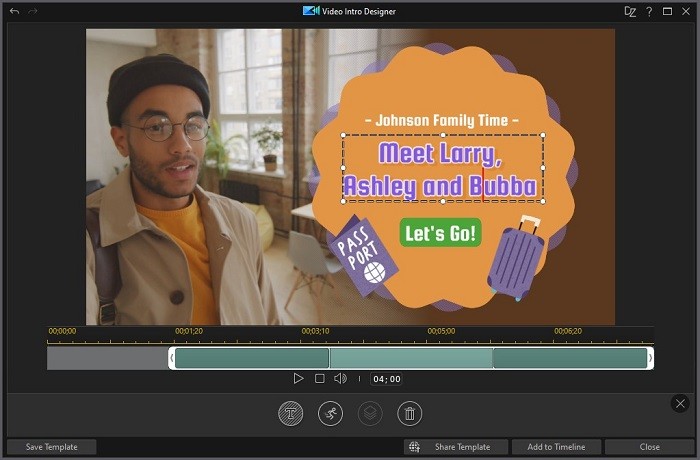
For more information on how to edit videos with YouTube intros, click here.
How to Add Transitions in Between Clips
- Navigate to the top left toolbar, and find the Transition Room icon that looks like a lightning bolt.
- Scroll through the categories and browse the transitions in each category. Click on a transition to view it in the Preview Window.
- Drag your chosen transition in between 2 clips on the Editing Timeline.
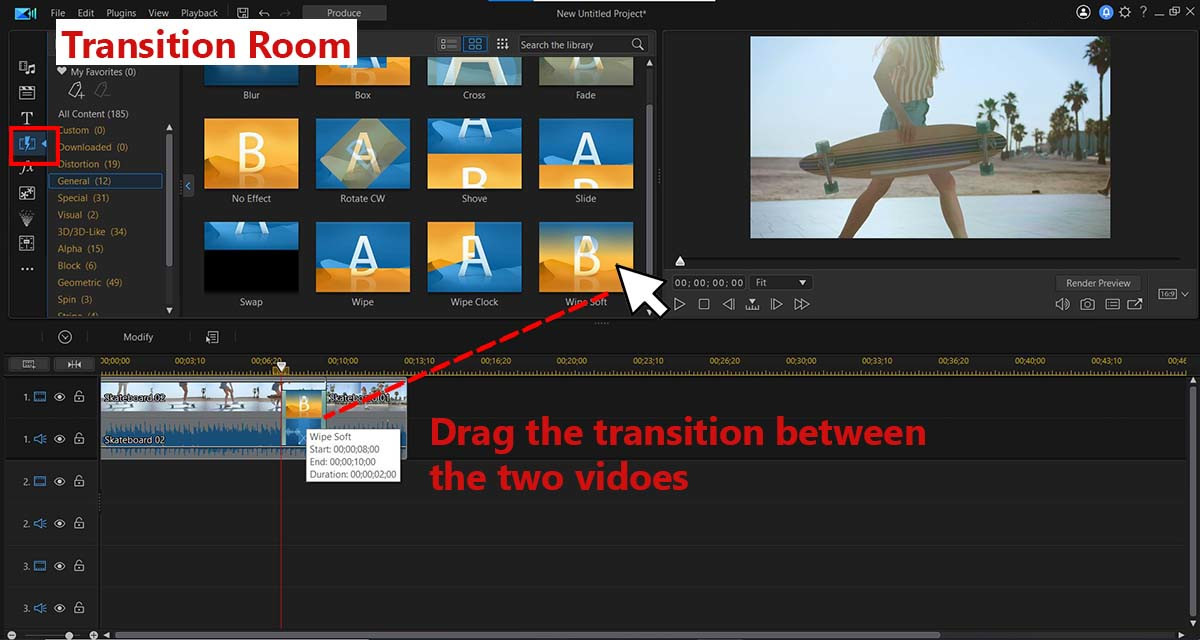
For more information on how to edit videos with transitions, click here.
How to Crop a Video
- Click on Tools from the menu right above the timeline, then Crop/Zoom/Pan from the drop-down menu.
- Move your cursor to a corner of your video until it becomes a Double Arrow, then move the Crop Box where you want it. You can also click in the middle of the Crop Box to move the entire thing.
- Crop the video to your liking and click Done.
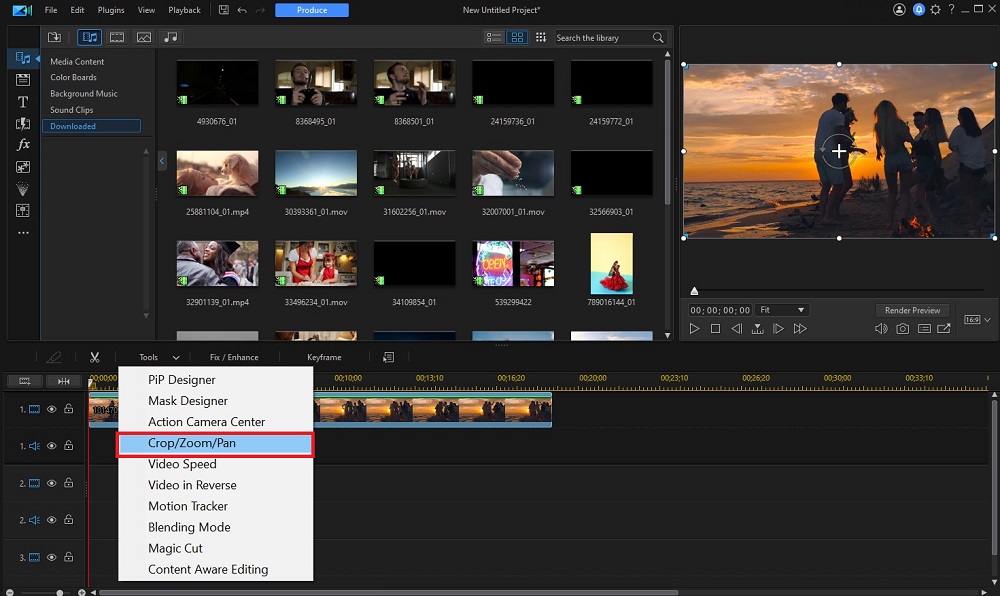
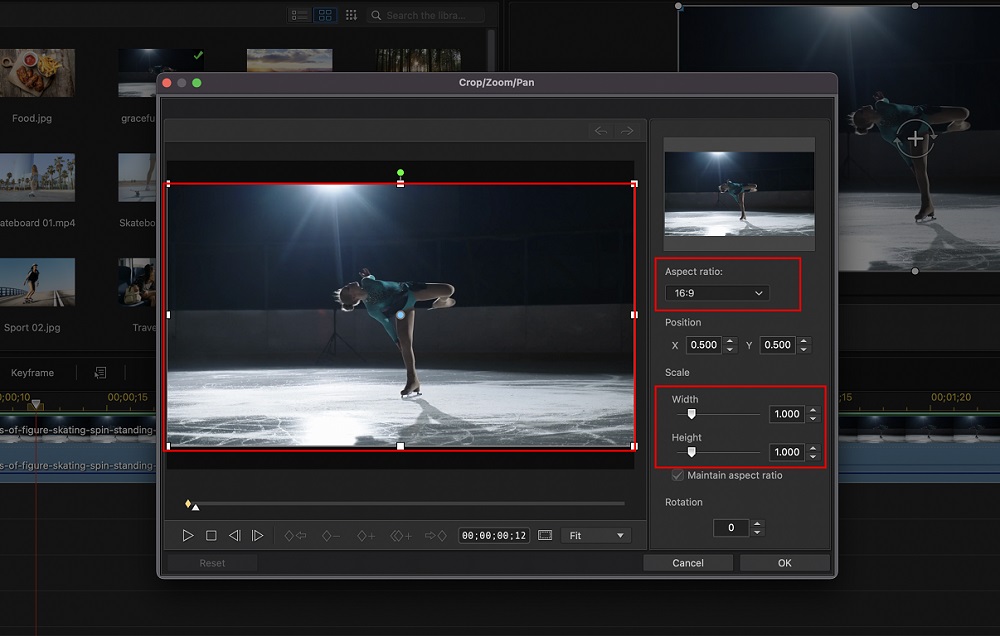
For more information on how to edit videos with a cropping tool, click here.
How to Add Text to a Video
- Click on the Title Room marked with the T icon in the left-hand side toolbar.
- Choose the Text Type from the list and explore the options within each type.
- Choose the text template you like and drag it onto the timeline below your video.
- Double-click on the text template to open the Title Designer.
- Use the various options to edit your text, then hit OK.

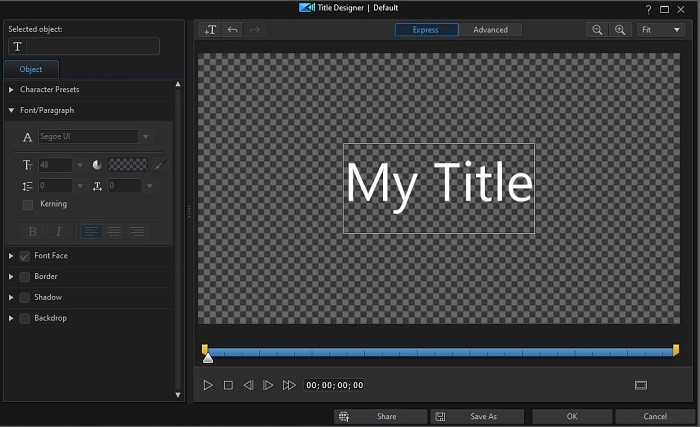
For more information on how to edit videos with text, click here.
How to Add Special Effects to a Video
- Click on the FX icon in the left-hand side toolbar to open the Effects Room.
- Choose either Style Effect, Color LUT, or Blending Effect, and browse the different effects under each subcategory. Click on an effect to download it and view it in the Preview Window.
- Drag your chosen effect onto a video clip in the timeline to add it to the entire clip.
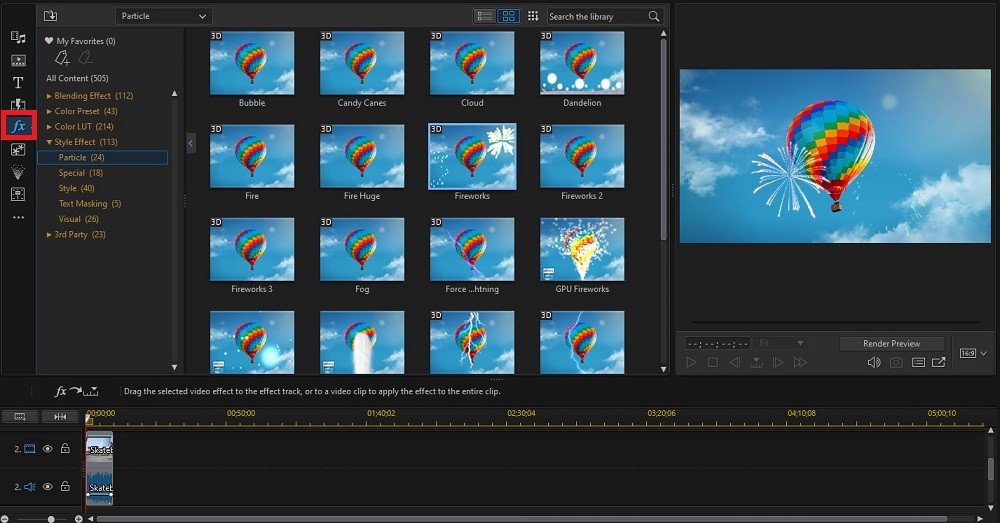
For more information on how to edit videos with special effects, click here.
How to Create an Outro With Templates
A good YouTube outro is about 10 seconds long and includes call-to-action requests, asking viewers to Like and Subscribe to your channel, visit your website, or click on another of your videos. Here are the steps explaining how to edit videos with YouTube outros.
- Navigate to the top left toolbar, and find the Intro Video Room icon that looks like a play button with three dots underneath.
- Scroll through the categories and find the one that best describes your channel.
- Browse the available templates until you find an outro design you like, then double-click it.
YouTube intros and outros are both included in the Intro Video Room. You will have to look through the available templates to find outros. - Customize the template in the Intro Video Designer. Click on any element in the preview window to edit it.
- When you are done with your outro, add it to your timeline at the end of your video.

For more information on how to edit videos with YouTube outros, click here.
How to Produce Your Video and Export it Directly to YouTube
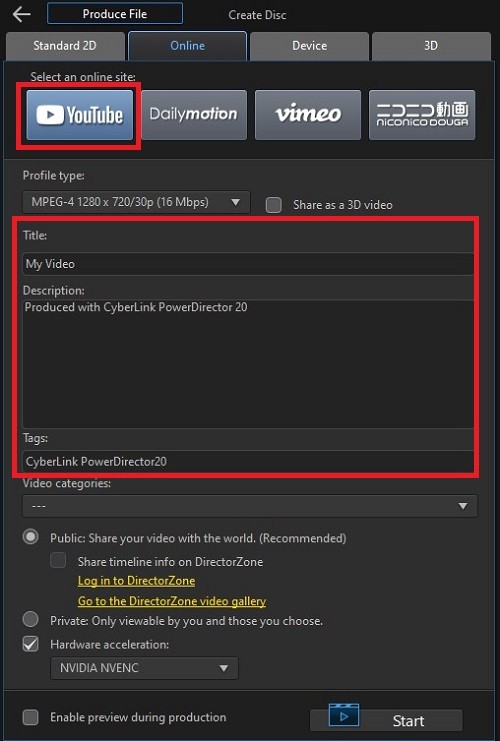
- Click Produce, then Online, then Choose YouTube.
- Choose a Profile Type from the drop-down menu, then fill in a Title, Description, and Tag.
- Choose a Video Category, then whether you want your video to be Public or Private. If you hope to monetize your videos, you need to choose Public.
- Click Start.
Be sure to research how to choose the best title, tags, and descriptions for your videos so that they follow YouTube guidelines and attract the most viewers.
Dos and Don’ts of Video Editing
If you’re learning how to edit videos for the first time, you should have a good foundation in basic editing procedures before moving on to advanced techniques. Once you are comfortable as an editor, you will know when the time is right to throw caution to the wind. Below are some Dos and Donts every new editor needs to know.
Dos
- Be Consistent
- Kill Your Darlings
- Blur Sensitive Info
Visual inconsistency is distracting to the viewer. When you edit clips, choose fonts and animation styles and stick with them for the whole project. Color correct and color grade each shot to look the same throughout.
Audio consistency is equally important. Do we hear loud background noise in one scene but not in the others? Do all the songs and background music have a similar feel?
This sinister phrase is common amongst all types of creatives and means that nothing should be so important it can’t be cut. Even if a scene is the greatest thing you’ve ever edited, it needs to go if it doesn’t serve the story as a whole.
In today’s world, any bit of personal info can help someone steal your identity. And if you are lucky enough to have thousands of followers on YouTube, you don’t want crazy fans tracking down where you live! You can easily blur license plates, house numbers, street signs, and more when you edit a video.
Don’ts
- Go Crazy With Transitions and Effects
- Ignore Continuity Errors
- Use Licensed Media
When you edit clips, typically a simple fade transition will help move to the next scene without taking viewers out of the story. There is a time and place for a fun, wacky transition, but use sparingly and only for a reason.
Don’t load your video with tons of visual effects that distract from the story or point of the video. When you are first learning how to edit videos, experiment with different effects so you know what tools are available and how to use them. But use sparingly and only when the situation calls for it.
Continuity errors are visual discrepancies from one shot to the next. For example, a cupboard is open behind an actor, then after a quick cutaway, the cupboard is closed. Or an actor is wearing a cardigan and suddenly the cardigan is gone.
If you edit a video that was shot by someone else, the continuity errors are not your fault. That doesn’t mean you can’t try to disguise them as much as possible. For example, if an object disappears from one shot to the next, use keyframing to take it out of all scenes. If it is nighttime when someone walks into a store and daytime when they come out, use color correction to match the lighting. If the weather changes drastically in real life but not in your story, a quick Sky Replacement will solve the problem.
It is tempting to use popular music when you edit a video. But sites like YouTube strictly enforce copyright laws and will remove videos with illegal music or other content. If you use a video editor with a royalty-free stock library, you will have access to millions of images, videos, background music, and sound effects without the worry of legal action.
Download the Best Video Editor for Free
If you’re learning how to edit videos and need a high-quality and easy-to-use editing program, we recommend downloading PowerDirector. PowerDirector is a powerful way to edit a video with an impressive range of tools and features. This program allows you to edit clips with AI-powered tools that apply top-quality edits with just a few clicks of a button.
PowerDirector is a great way to edit a video for YouTube. It offers direct uploads to YouTube, pre-selected YouTube aspect ratios, and thousands of templates for YouTube intros and outros. You can even bundle the software with PhotoDirector, an image editing software ideal for creating YouTube thumbnails, banners, and social media posts for your channel.
Along with allowing you to edit a video with base-level crops and adjustments, PowerDirector includes the following pro-level features:
- Motion tracking
- Green screen editing
- Keyframing
- Masking and blending
- Video stabilizing
- Video collage designer
- Stock library of 8,000,000+ videos, photos, and music tracks
- AI-powered tools
And more!
Download PowerDirector today by clicking the button below to start making stunning, professional-looking videos to impress your family, friends, or followers.
Video Editing FAQ
Here is a step-by-step guide for how to edit videos on your phone.
Download the PowerDirector app and follow along:
- Open the PowerDirector app and Create a New Project.
- To trim your video, add it to the timeline and move the Sliders on each side of the clip. This changes where the video starts and stops.
- To split your video, move the Playhead where you want to cut. You will see a white line at that mark. You can pinch open the clip to zoom in on the video.
- Tap the Split icon to slice the clip.
- To add text and titles, click the Layers icon on the left. It resembles two pieces of paper, one on top of the other.
- Drag your favorite text template onto the timeline over your clip. Extend the text or title to the desired length.
- Tap the clip to change the text. Click the Edit icon around the text in the frame. This feature lets you tilt or change the size of the text.
You can tap the Play button any time during the edit to preview your new clip. - Click Produce Video. This step allows you to save it to your gallery, Facebook, YouTube, or other social media platforms. You can also adjust the video resolution, edit the project title, and toggle the settings.
- Click Next to send your video to the desired location.
To learn more about editing on your iOS or Android device, click here.
If you are learning how to edit videos for the first time, you won’t know what features are most important. Here are the top ten features to look for in a video editor:
- Basic cutting/trimming tools
- Beginner-friendly
- Titles/text
- Color adjustment tools
- Audio adjustment tools
- Transitions
- Motion tracking
- AI-powered tools
- Fast rendering
- Royalty-free stock library
If you’re looking to edit a video with a product that checks all of these boxes, we recommend PowerDirector.
- PowerDirector
- iMovie
- Splice
- Quick
- Kinemaster
For an in-depth look at the above apps, check out the 10 Best Free Video Editing Apps in 2022.
If you are learning how to edit videos for the first time, try beginner-friendly video editing software, such as PowerDirector. It has a user-friendly interface and lots of easy-to-use features and effects that can edit a video automatically with one click. There are also guided edits and plenty of tutorials available if you need them.
All you need to edit a video is a computer/phone/tablet and video editing software.
Most YouTubers use PowerDirector to edit clips for YouTube. PowerDirector is easy-to-use for all skill levels, affordable, and has tons of fun effects, stickers, and features.
PowerDirector also has templates for YouTube intros and outros, YouTube-specific aspect ratios, and direct upload to YouTube.
It used to be that only professionals could edit a video. Fortunately, these days anyone can learn how to edit videos with beginner-friendly and easy-to-use editing software, like PowerDirector.
With PowerDirector, even first-time editors can edit a video that looks professional.
PowerDirector has tons of learning tutorials that teach how to edit videos. Visit the Learning Center to find how-to guides for any editing task.
The 321 rule refers to having 3 separate copies of every video file you need to edit a video. Typically, this means one copy on the hard drive of your computer, one in cloud storage, and one in an external hard drive or flash drive.
Most video footage is irreplaceable. You can’t re-create a vacation, major life event, or important childhood milestone, so protecting your footage should be a big priority.
If you need to edit a video that is 10-minutes long, it could take anywhere from 2 hours to 2 days. It entirely depends on the amount of source material you need to go through and how straightforward the edit is. A vlog, for instance, will have only a few long, continuous cuts, and the story will already be laid out in the correct order. The editing for this kind of video will only require some trimming, a few transitions, adding music, and adding in your intros and outros.
The same thing goes for a video or photo collage, where you simply choose a collage template and insert your media.
If you need to edit clips for a short film, it will take longer. With a narrative film, you will have a lot more footage to go through, and you’ll have to cut back and forth between speakers. You may have to edit clips with special effects and color corrections for a professional look.
Even if you don’t have a YouTube channel, learning how to edit videos is important in today’s world. Edited videos on Instagram, Facebook, and TikTok receive more likes and comments than raw camera footage. Knowing how to edit videos is also a helpful skill for adding pizzazz to home videos or putting together a video or photo collage for a wedding, funeral, or family reunion.
Why not learn a valuable skill such as how to edit videos, when learning the basics takes no time at all?
If you are learning how to edit videos, it's helpful to understand a few terms and processes before diving into an editing program. Here is a bit of basic information about the components involved in editing a video:
Timeline: The timeline is where you will edit clips by cutting, arranging, and adjusting. You can think of the timeline as the place to change the sequential elements of your video.
Editing tools: Most editing programs include an assortment of editing tools that you can use to edit a video by adjusting speed, audio, and colors, and adding text and visual effects to your footage.
Library: The library is where you will store all the media elements that you need to edit a video. Some editing programs also include free stock videos and photos in the library that you can add to your video.
Preview window: The preview window will show you the changes and cuts you made to your edited clips.
The most common editing techniques you should master if learning how to edit videos are:
- Trim/Split video
- Add transitions
- Color correct/grade
- Add music/sound effects
- Add titles
To learn how to edit videos with common editing techniques, browse the How-To guides here.


